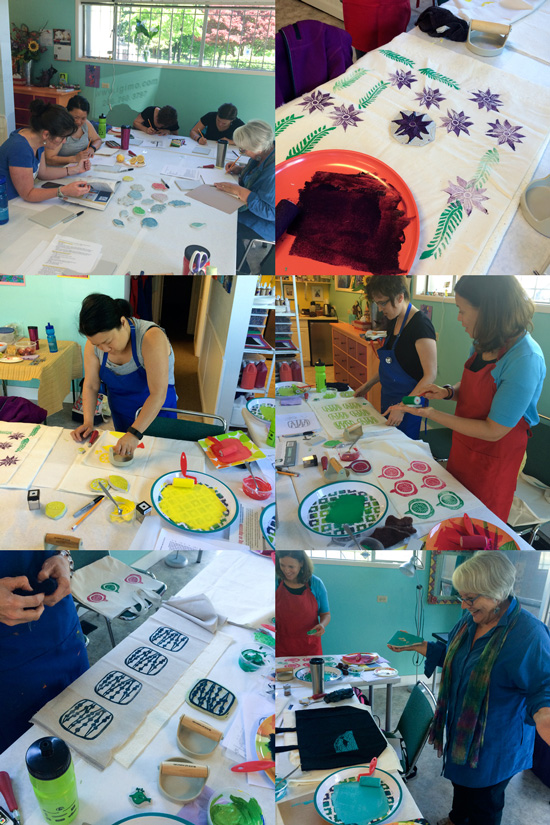
I taught my first Block Printing on Fabric Workshop at IGIMO Art Station in Seattle in April and May.
And it was a blast!
Check out some of the beautiful work my students created!!

I was nervous at first that I didn’t know enough to teach people. After all, I just learned how to block print a little over a year ago.
But I’ve also been practicing a lot and knew enough to teach beginners.
Like Sean McCabe says in this podcast episode, you don’t have to be a master to be able to teach what you know.
If you want to become good at something, teach others how to do it. The former doesn’t have to precede the latter. Teaching is learning.
— Sean McCabe (@seanwes) April 17, 2014
If you’re level 3, you can still teach level 1 and 2. It’s actually better that I’m not a master block printing artist because I can understand better the struggles beginners might have.
In the spirit of sharing what I know, I wanted to tell you some of the lessons and tips I’ve learned about putting on an awesome workshop!
1. Develop a positive relationship with the venue owner and respect the facility.
I got introduced to Sally, the owner of IGIMO Art Station by a friend of mine late last year. IGIMO is an art studio in my neighborhood, and they offer lots of fun art classes for kids and adults.
When I pitched the idea of teaching the block printing workshop at her studio, Sally was super open and supportive. She made me feel welcome and so generously offered me to use her space in whatever way I needed.
In order for me to continue our positive working relationship, I try to keep an open and consistent communication with her and make sure we’re treating her studio space with respect.
2. Tell everyone you’re offering a workshop. Repeatedly. Everywhere.
I swear, marketing is all I do nowadays.
Because, you know, even if you make really awesome art or offer super fun workshop, it won’t matter if people don’t know about it!
I started promoting my workshop early on (about 2 months before?) on my social media, email list, and posting flyers in the neighborhood. And I did that multiple times.
By the way, I had a great return on investment with boosting my event on Facebook. I spent about $50 to boost my event post for like 6 weeks (roughly $1 a day) and got at least 3 sign-ups via FB (that’s $375 revenue). I’ll probably try that again!
3. Try to answer as many questions as possible up front by providing FAQ on your website.
When I posted the information about my workshop on my website, I just had a basic information, like dates, time, location, a brief description, and cost.
So when a very first student signed up, I sent her a welcome email and asked her if she had any questions. She did have a couple of really good questions I wasn’t thinking about, and I was able to incorporate them into the Frequently Asked Questions list I was working on.
Having some sort of FAQ is going to be super helpful because many students will have the same questions, and it saves you and them time if you can point them to the list instead of replying to their questions individually.
My FAQ includes informations like the day’s schedule, what to do about lunch, what to bring, what to wear, where to park, size of the class, and my cancellation policy.
I keep adding more questions/answers to the list as I go. You can take a look at my FAQ here if you’re interested in learning what I included in there!
4. Send welcome messages and reminders.
I just embedded simple PayPal button on my website (here is the instructions on how to do it. It’s pretty easy) for registration and ask them to enter their name and email. No bells and whistles there.
When I receive the notification for their payment, I send them a welcome message confirming the receipt of the payment, date/time of the workshop, and attach the FAQ in case they haven’t seen it.
Like I said earlier, I have a cancellation policy that’s included in the FAQ and want to make sure my students are aware of that in advance.
This is also a good time to see if they have any other questions my FAQ is not answering.
If I worked on any new block printing project or found cool resources between their registration and the class, I would share the information with the students on the list to get them excited.
I typically send them a reminder email a couple of times – once about a week before and then just a couple of days before the workshop date. Again, I’ll confirm the date/time and attach the link to my FAQ.
I know we all get busy and don’t read every email we receive (or read the email throughly), so I like to remind folks more than once.
I also include my cell phone number in the last reminder so they can contact me directly on the day of if needed.
When I’m setting up for the class in the morning, I’m not checking my email (and I never have my email notification on) so the cell phone is easier for any last minute communication.
5. Provide visual examples and inspirations before and during the workshop.
When you’re working on an art or craft project, it’s always helpful to have reference materials and inspirations handy.
If you’re new to the craft, the blank canvas can seem very overwhelming and your student might not know where to start.
So I’ve created a block printing design inspiration board on Pinterest (you can view it here) and share it with my students when they sign up.
I pinned variety of styles and designs, from intricate florals to simple geometric shapes, so the students who are not super comfortable drawing know that they can still make beautiful designs without any drawing skills 🙂
I also bring my favorite block printing book, Making an Impression by Geninne Zlatkis (it’s the most beautiful craft book I’ve seen!!) and some of my carved blocks to the class for reference.

6. Break down your process into small steps and document them.
Although I’m still relatively new at block printing, I’ve had many practices so far and no longer have to think about the steps when I block print.
So when I was working on a block printing project for Valentine’s earlier this year, I paused every so often and documented every step. I actually got a blog post out of it, so that was even more awesome 🙂 (You can read it here. )
While I was working on it, I tried to put myself in the shoes of someone who’s not familiar with the tools or processes at all. I also read a bunch of how-to articles on block printing to learn what processes others followed and tried to see if I was missing anything.
Having a documented step-by-step process also helps ensure that your students are getting a consistent instruction.
I also take notes while teaching the workshop on where students get stuck or have a hard time understanding my instructions so I can improve my teaching for the future workshops.
7. Have all the supplies ready and make sure they work!
When I was planning for the workshop, I wrote down every single item we were going to need for the workshop and researched where I could get them at a cheaper price.
I set a goal to at least order everything a month before the workshop date. That way, if something goes wrong or the shipment gets delayed, ideally I’d still have time to fix the issue… 😀
AND, when you get your supplies, make sure to open the package and see if they actually work. I learned the lesson the hard way with the linocut tools I ordered.
They came on time, and I assumed they were all fine. But the day before the workshop, I decided to take the tools out of their individual box and assemble them just to make sure it came with all the parts necessary.
And I found out 3 out of 8 tools had defects and didn’t work!
It ended up working out OK because I’d ordered extra (another important point!) and at that time, I had 5 students signed up for the workshop. But I certainly didn’t enjoy that “oh sh*t” feeling the night before my first workshop 😀
8. Provide resources and handouts.
I wanted my students to get as much value out of the workshop as possible since they’re paying to spend a day to learn something.
So I put together a packet for each of them to take home. It includes materials list, where to get exactly the same tools and materials we’ve used in the class, overview of the steps, tips, and other block printing resources.
After they learn the basics in my workshop, I want them to go home with confidence and continue exploring the craft on their own.
With the well-organized handouts and resources, my hope is that they will!
9. Walk around and check in with each student during the workshop.
This workshop is pretty hands-on, and students spend majority of their time working on their own project.
Some students are more vocal about their needs than others, and it’s easy for me to know what they need and help them.
I also try to check in with other, quieter students just as often – not because I don’t think they’re doing a bad job, but sometimes people are shy about asking for help, or they might otherwise don’t catch potential problem areas before it’s too late.
For this purpose, and since I’m still learning, I keep the class size pretty small (max. 6 students). I like the intimate environment a small class creates and believe it provides a better learning experience for my students as well.
10. Ask for feedback and testimonials. And don’t forget to take photos!
At the end of the workshop, I hand out a short feedback form. I ask a few simple questions, like what they enjoyed the most, what could be better, and if they’d recommend the workshop to their friends and family.
I also ask if I could use their feedback in my marketing materials, and most of them would say yes.
When the students enjoy the workshop and are excited about what they’ve just created, they are much more likely to give you a great testimonial. And including the question in the feedback form makes it more convenient for both of you!
Your students can also give you great ideas about what other workshops or services you could be offering. For example, a couple of students in the last workshop asked if I’d be offering any “second stage” block printing class or an open studio. And maybe private group sessions for adult birthday party! How fun!
I also try to take photos during the class (with their permission, of course) so I could use them for marketing/promotional purposes. It’s so fun to share the amazing work they do with the world 🙂
11. Send them thank you message.
Finally, a day or two after the workshop, I send a quick email thanking them for their participation and share the photos I took during the class.
I let them know they can contact me if they have any questions in their future block printing practice.
If they indicated on the sign-in sheet that they’re interested in joining my email list, I subscribe them so they can stay informed about my future offerings and updates.
I indeed learn so much by teaching!
And I LOVE it 🙂
I feel so lucky to be given this opportunity and am looking forward to teaching more in the future!
p.s. If you’re in Seattle area, you can join one of my workshops this summer 🙂 Check out the class schedule here.
xo Yuko


Hi! I’ve been reading your blog for quite some time now and I always find it inspiring to learn about how you work. I started to teach glass fusing classes about a year ago and I recognize a lot that you write about in this post and I also learned a few new things that I havn’t thought about before. I really like the way you interact with your students and even though I work for an adult educational association which means that they are responsible for the registraton, evaluations and so on this gave me great ideas for how I can be better at this. Thanks for sharing! Best wishes, Linda
Hi Linda! Thank you so much for reading my blog and sharing your thoughts with me 🙂 I’m glad to hear it’s helpful. I’m really enjoying teaching. I’m sure there will be more “learning opportunities” for me in the future and I look forward to sharing them with you! Yuko
I am sure the workshop was great. Your passion for the subject and for teaching and the desire to learn all you can is so apparent. Those students were lucky to have such a prepared teacher! Best of luck with workshops in the future.
aww, that’s so sweet! Thank you so much Eileen 🙂 You made my day! xo
These are great tips! I love the idea of sending people photos of the workshop afterwards – that’s a great way to add value for them. And checking supplies is a must – I had ‘oh sh*t’ moment DURING my first workshop ever when I opened up the tools to see that they were the wrong ones. It was mostly my friends attending and we muddled through but I’ve been extra careful ever since!
Thanks Stephanie! We live and learn…and situations like that can only help us 1) be a creative problem solver and 2) have a story to tell later on 🙂