I can’t believe my next mini sabbatical week is coming up! It’s been 6 weeks already?? Time sure flies.
I’m actually taking an extended sabbatical this time and going to a 10-day silent meditation retreat.
I’ll be gone from June 1 through 12.
I went to my first silent meditation retreat about 3 years ago, and it totally changed my life! It was so enriching and deeply healing. I remember coming out of it feeling so content and happy. Like I didn’t have any emotional or physical knots anywhere.
As the name of the retreat suggests, you don’t talk to anyone for 10 days and either meditate or learn how to meditate for a good chunk of the day from 4am to 9pm .
(You can see my experience from the last meditation retreat in this post if you’re interested. You can also learn more about this particular meditation retreat here.)
I signed up for this retreat earlier this year. I didn’t know why exactly, but I felt ready for it. Last time I went was the spring before I got married. It was also the time when I was contemplating cutting back my hours at my day job so I could dedicate more time and energy into art.
I had another huge life change last summer when I quit my day job cold turkey and felt I needed to pause again to reflect on things that have happened since then.
To be honest, I’ve been feeling pretty anxious about it. I’m nervous about not working for so many days. In fact I’ve thought about postponing it more than once. It’s not like I have employees who can run the show while I’m gone. When I’m gone, my business needs to be on hold, too.
But I figured there is never a “good” time to take off anyway.
When you are an entrepreneur, there is always things to do. Your to-do list never ends. You could easily end up working ridiculous hours, never taking a day off, and burn out eventually if you’re not careful.
I’ve talked to Dave about my concerns, and he reminded me how great I felt last time I went to the retreat. He really noticed I came home a different (i.e. better) person then!
Another friend I talked to pointed out to me that this time of reflection will help me recharge my creative battery, too. So while I’m not able to “work” per-se during the retreat, I’m still doing something positive to grow my creative business.
So I’m giving myself a permission to go and enjoy my time to just sit quietly.
The hardest part of silent meditation for me is not the no-talking part.
I actually really enjoy that part. I’m a proud introvert, and it’s nice that even if you’re surrounded by strangers, you’re not expected to make a small talk with anyone 😀 Not talking to anyone for 10 days while having no responsibility was pretty amazing!
The toughest part was being alone with the endless thoughts that came up.
It was the dark and angry thoughts that upset me the most. I was surprised I had so much anger inside me for so long. And it was a constant practice of noticing those thoughts, observing them without a judgement, and letting go of them. Over and over.
It seemed like my mind never shut up! And without other noises distracting me, the voice in my head grew louder. What a fascinating experience it was!
I’d also come up with the best ideas while I was meditating. But you’re not supposed to write down anything either, so that was another tough part.
You learn to let go of things. Whether it’s good or bad.
You’re also not allowed to draw or exercise during the retreat. I know that will definitely be a challenge for me!
But like the last time, I’m trying not to have a lot of expectations. I will experience what I’m supposed to and gain (or not gain) whatever comes out of it. Maybe I’ll have a totally awesome experience again. And maybe I won’t. And that’s OK, too.
I’ll be completely offline between June 1 and 12. That means there will be two weeks without any new blog posts! If you comment or send me any questions, I won’t be able to answer them until after I come back.
I can’t wait to tell you all about it when I come back! Take care until then ❤
p.s. If you wanted your Father’s Day card in time, order it tomorrow, Monday, May 30, for timely shipping 🙂
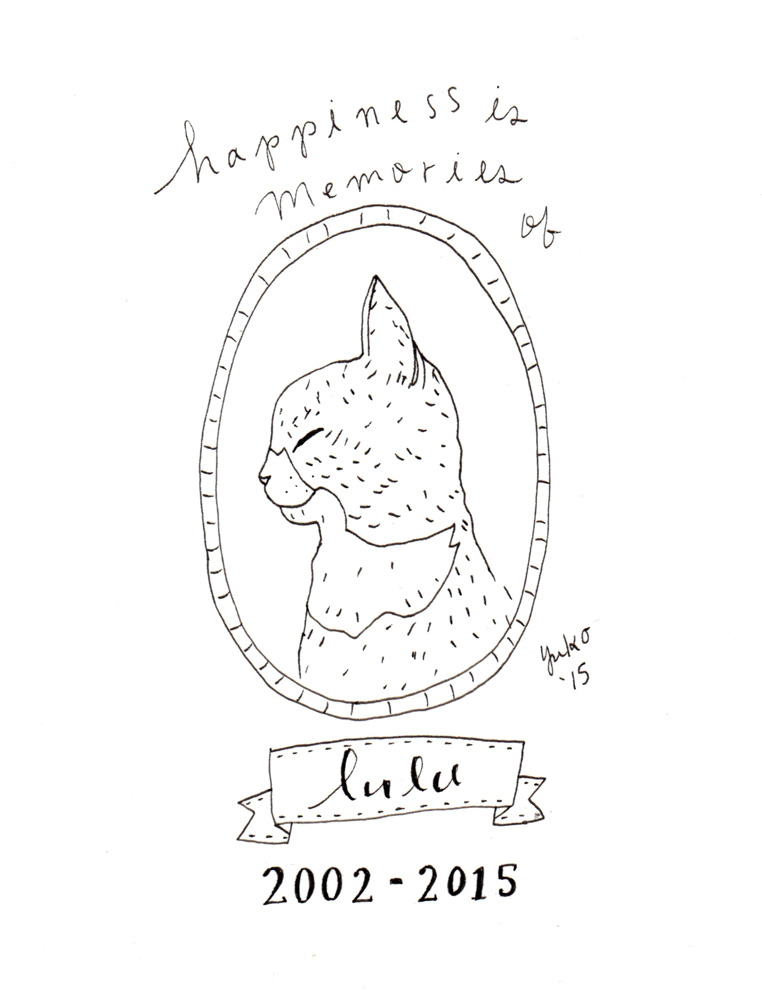
Since my parents wouldn’t let me have cats for a long time, I fantasized about having one pretty much 24/7.
My husband, Dave, always loved animals and was more of a dog person when we met. He was even allergic to cats growing up. But magically, he grew out of his cat allergy as he got older – it’s like he was destined to meet me, a hopeless cat-lover!
I had my two cats, Lulu and Sheppie, from my previous relationship, when we met.
Lulu (left) and Sheppie (right)
They were pretty much my babies. It was important to me that whoever I’d bring in to our life would understand how important they were to me and at least tolerate them, if not love them.
To my delight, my kitties won him over pretty quickly with their cuteness, loving personality (in their cat-like ways), and their comical antics.
Dave is so sweet and loving with any and all cats he meets. I sometimes wonder if he’s become a bigger cat person than I am now!
We’ve been through some scary and tough situations with our cats, too – especially, losing Lulu last year was extremely heartbreaking. He’s been my rock through thick and thin, and I’m really grateful to have him in my life.
Our sweet girl.
On Father’s Day, I like to thank him for being an awesome dad to my cats.
I’ve been making a cat Father’s Day card just for him in previous years because let’s face it, my cats are not very crafty 😀
And, I thought there might be other people who want to celebrate their cat dad, too!
So I decided to share this special Father’s Day card with you.
“Thank you for being an awesome dad to my cats.” Father’s Day card, 4.25″x5.5″ folded, blank inside.“Thank you for being an awesome dad to my cats.” Father’s Day card, 4.25″x5.5″ folded, blank inside.
Make your special (cat-obsessed) man smile this Father’s Day 🙂 You can order yours here.
p.s. I’m going to be closing my shop between June 1 – 12, 2016 so please place your order before May 30th in order for your card to be shipped by May 31st!
It gives me a creative outlet that allows me to share and connect with you in a different way than my visual arts do.
Writing used to be a chore, and I avoided it at all cost. After all, I’m a visual artist and why do I need to write anyway, right?
I changed my mind about it and started being more intentional about writing after I listened to this podcast episode of Sean McCabe. Writing bridges the gap between your work and your audience.
So I started writing every day. It was the first thing I did every morning after I left my day job last summer. And as I wrote more, I was able to find my voice and have become more comfortable with writing. It’s just something I do nowadays.
When my friends ask me if I’m making art all the time, sadly my answer is “no.”
I’m writing all the time. Or at least I feel like I’m writing all the time.
Back in January, I set a goal to publish at least 3 blog posts per week. With the new focus on creating more products this year, I felt like publishing an article once a week just wasn’t enough to share my creative process and inspirations, on top of the more self-helpy contents I’d been writing.
I’m a big believer of having multiple blog posts in a queue (in fact that’s my number 1 advice to people who want to start blogging consistently. You can read my other advices here.)
But lately, I’ve been struggling to keep up.
I mentioned in my last post that I had some health challenge, and I also had a cold that put me out of commission for several days. Getting older sucks sometimes…
Coupled with the unexpected health issues, I’ve also been teaching more, and planning, designing, creating, and launching my new product line took up a lot of time and energy during the last few months!!
I write every day, but I’m also writing for different purposes with an increased output for multiple platforms.
For instance, with my new teaching opportunities, I’m writing specific marketing contents for my e-newsletter, web, and social media, including blog posts. And for my product launch, my marketing effort on all the different platforms had to multiply, too!! And it doesn’t just end when it launches, either. (surprise!) It just keeps going… 😀
It’s to say, I’ve been a little behind on my blog writing and ran out of my reserve.
And you know me – I do better with structure and organization, and not having back-ups is very stressful. It takes up a lot of mental space because I’m constantly thinking I need to write my next post, and by the time I write one, it’s published right away, and I’m back to having zero post in my queue.
It’s also given me a pause to ask myself, “How is my blog helping me to reach my bigger goals?”
I know my blog has helped me to build a supportive community of artists and makers, which I appreciate SO much. I just need to take some time to figure out how else my blog is helping me to achieve my bigger goals and also build up enough reserves in the queue.
I also need to find a balance where I can spend enough time and energy to create useful and effective contents for each platform I write on and consistently create a strong body of artwork at the same time.
With that being said, I still want to keep providing you with creative inspirations through my blog!
For now, I’m going back to posting an article once a week.
I might do extra posts here and there depending on what’s going on and if I have a time-sensitive news I want you to know about. I’ll keep you posted on what the future of my blog will be!
Thank you for your understanding and support! I’ll see you soon 🙂
It’s a time when I intentionally slow down and focus on things I don’t get to normally. I might work on fun creative projects for myself or reflect on my business goals and processes during my mini sabbaticals.
You can see a couple of my past sabbatical report backs here and here by the way.
What’s great about taking a regular time-off is I can schedule work in advance around it, and it motivates me to hustle and stay productive when I’m “on.”
Because I work very hard on weeks between my mini sabbaticals, I usually enjoy my time off relatively guilt-free.
By the time my 7th week rolls around, I’m SO ready. I can definitely feel the burn and feel my time off is well deserved.
But what about the time when I’m forced to slow down outside of my scheduled time off?
Life happens. You try your best to “schedule” things and stick to them, but it doesn’t always happen according to your plan.
I had to face this during February and March of this year when I suffered a stomach ulcer. And it really forced me to slow down and take care of myself
It didn’t come easy. I felt so guilty slowing down even though I was in a lot of pain.
Before I knew I had an ulcer, I just thought I had an upset stomach for some reason. I’d been on a Candida diet for several weeks prior and just started adding some foods back in my diet again. So I thought it was a natural reaction to the diet change and tried to “wait and see” if it got better on its own.
Weeks passed by, and it got worse.
I couldn’t eat very much and was feeling weak. I was depressed because I couldn’t eat (and you know how much I LOVE to eat!) and was afraid to eat because the pain would come after eating. I wasn’t sleeping well due to the pain or the fear of pain.
I was stressed out and scared. Desperate for information, I looked it up on the internet, and it tells you all kinds of potential causes for your symptoms, including cancer…(which I believed wasn’t the case based on other symptoms but still scary.)
Our insurance coverage (we’re on Obama care) is less than awesome, so the potential medical cost would stress me out, too.
I felt bad and guilty laying around on the couch during the work hours.
I thought, my eyes and hands still work, so I should be able to do work.
If I “took it slow” outside of my scheduled time off, I won’t be able to achieve my goals, will I? Nobody else can do what I do for me. And, I don’t have a paid sick leave any more!!
I’d press on even if I was in a lot of pain. I’d try to stick to my regular routine as much as possible.
I didn’t want to admit to myself that I needed to course correct because I didn’t think I could afford to.
Eventually, I saw my naturopath and got the diagnosis. She put me on a treatment plan, and I gradually started feeling better.
Putting a name to what I was experiencing helped shift my mindset. It gave me a permission to focus on healing.
When I thought I was just having a random stomachache, I was so annoyed and tried to ignore it.
But as soon as I learned the official diagnosis, it suddenly made it OK for me to focus on feeling better. It made my experience somehow more real and serious.
Like, finally I had a legitimate reason to slow down.
It’s weird I needed someone with an authority to tell me what I was experiencing was a real thing, and that I didn’t need to feel guilty about slowing down. But apparently, I did.
My work and goals were important, but it wasn’t worth sacrificing my health for.
I needed to prioritize getting better, and everything else needed to take a back seat.
So whenever the pain would come on, I didn’t even bother to get any work done. I simply stopped resisting. I just laid on the couch and did things to help ease the pain (heat pad, massage, tea etc.) for as long as I needed.
I also learned to use the time between my bouts of stomach pain to focus on my work. I had a shorter amount of time to work, so it naturally helped me to stay motivated and productive.
Fortunately, I responded to the treatment really well and have been feeling well since April! Thank goodness for that!
Nothing makes me more grateful for my health than having been ill.
You can schedule your sabbaticals, but you can’t schedule when you get sick.
When you get sick and your body is screaming for help, don’t resist it. Give yourself permission to tend to your needs. If you have a hard time doing that, like I do, let someone else tell you it’s OK.
And when you slow down to take care of yourself, stop feeling guilty about it. Guilt does not serve anyone, and it certainly doesn’t help you heal faster 🙂
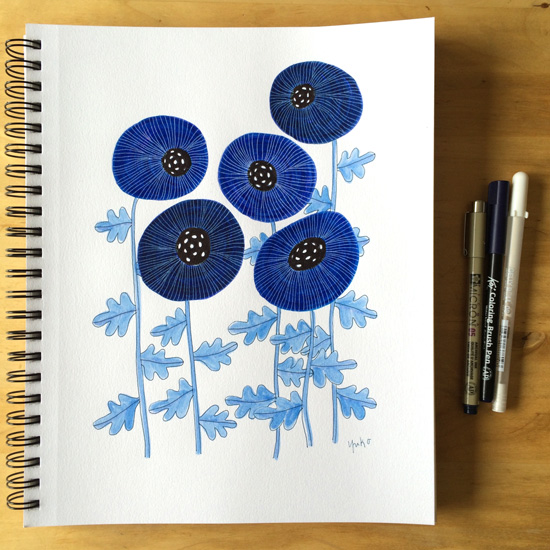
I’m still really into drawing them and wanted to share my recent sketchbook pages today!
And I have a mini video at the end, so keep scrolling down 🙂
These colors really make me happy.Most of my poppy drawings are done with Micron pen and Sakura Koi brush pens!Love this pink and magenta combo!I also tried more cooler colors. This one with Micron pen, Koi pens, and white Gellyroll pen.
Darker blue poppies turned out pretty, too.
As promised, here is a very short poppy drawing video 🙂
And, if you want to learn how to draw these fun poppies, you’re in luck!
I recently made a video tutorial for Sakura of America, and this FREE video will be available on their YouTube channel soon!
I enjoyed creating the tutorial and suspect there will be many more in the future 🙂 I’ll keep you posted on when they’re gonna come out!
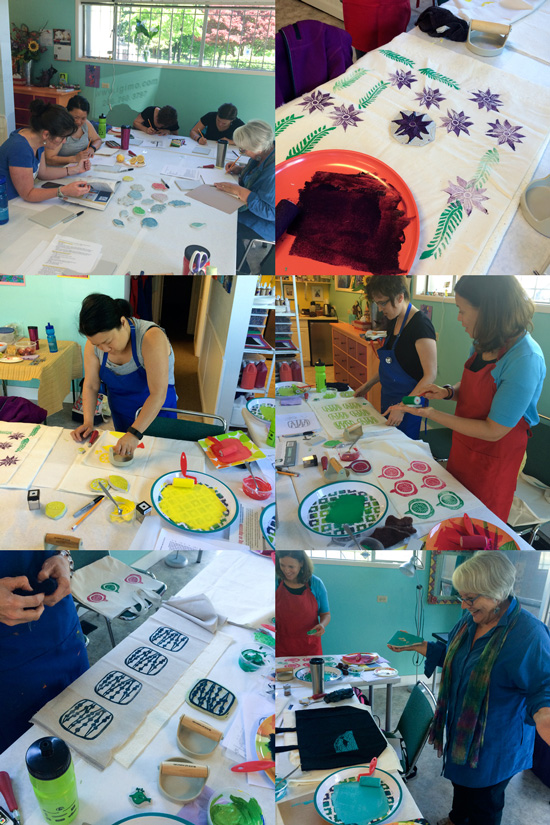
If you’re level 3, you can still teach level 1 and 2. It’s actually better that I’m not a master block printing artist because I can understand better the struggles beginners might have.
In the spirit of sharing what I know, I wanted to tell you some of the lessons and tips I’ve learned about putting on an awesome workshop!
1. Develop a positive relationship with the venue owner and respect the facility.
I got introduced to Sally, the owner of IGIMO Art Station by a friend of mine late last year. IGIMO is an art studio in my neighborhood, and they offer lots of fun art classes for kids and adults.
When I pitched the idea of teaching the block printing workshop at her studio, Sally was super open and supportive. She made me feel welcome and so generously offered me to use her space in whatever way I needed.
In order for me to continue our positive working relationship, I try to keep an open and consistent communication with her and make sure we’re treating her studio space with respect.
2. Tell everyone you’re offering a workshop. Repeatedly. Everywhere.
I swear, marketing is all I do nowadays.
Because, you know, even if you make really awesome art or offer super fun workshop, it won’t matter if people don’t know about it!
I started promoting my workshop early on (about 2 months before?) on my social media, email list, and posting flyers in the neighborhood. And I did that multiple times.
By the way, I had a great return on investment with boosting my event on Facebook. I spent about $50 to boost my event post for like 6 weeks (roughly $1 a day) and got at least 3 sign-ups via FB (that’s $375 revenue). I’ll probably try that again!
3. Try to answer as many questions as possible up front by providing FAQ on your website.
When I posted the information about my workshop on my website, I just had a basic information, like dates, time, location, a brief description, and cost.
So when a very first student signed up, I sent her a welcome email and asked her if she had any questions. She did have a couple of really good questions I wasn’t thinking about, and I was able to incorporate them into the Frequently Asked Questions list I was working on.
Having some sort of FAQ is going to be super helpful because many students will have the same questions, and it saves you and them time if you can point them to the list instead of replying to their questions individually.
My FAQ includes informations like the day’s schedule, what to do about lunch, what to bring, what to wear, where to park, size of the class, and my cancellation policy.
I keep adding more questions/answers to the list as I go. You can take a look at my FAQ here if you’re interested in learning what I included in there!
4. Send welcome messages and reminders.
I just embedded simple PayPal button on my website (here is the instructions on how to do it. It’s pretty easy) for registration and ask them to enter their name and email. No bells and whistles there.
When I receive the notification for their payment, I send them a welcome message confirming the receipt of the payment, date/time of the workshop, and attach the FAQ in case they haven’t seen it.
Like I said earlier, I have a cancellation policy that’s included in the FAQ and want to make sure my students are aware of that in advance.
This is also a good time to see if they have any other questions my FAQ is not answering.
If I worked on any new block printing project or found cool resources between their registration and the class, I would share the information with the students on the list to get them excited.
I typically send them a reminder email a couple of times – once about a week before and then just a couple of days before the workshop date. Again, I’ll confirm the date/time and attach the link to my FAQ.
I know we all get busy and don’t read every email we receive (or read the email throughly), so I like to remind folks more than once.
I also include my cell phone number in the last reminder so they can contact me directly on the day of if needed.
When I’m setting up for the class in the morning, I’m not checking my email (and I never have my email notification on) so the cell phone is easier for any last minute communication.
5. Provide visual examples and inspirations before and during the workshop.
When you’re working on an art or craft project, it’s always helpful to have reference materials and inspirations handy.
If you’re new to the craft, the blank canvas can seem very overwhelming and your student might not know where to start.
So I’ve created a block printing design inspiration board on Pinterest (you can view it here) and share it with my students when they sign up.
I pinned variety of styles and designs, from intricate florals to simple geometric shapes, so the students who are not super comfortable drawing know that they can still make beautiful designs without any drawing skills 🙂
I also bring my favorite block printing book, Making an Impression by Geninne Zlatkis (it’s the most beautiful craft book I’ve seen!!) and some of my carved blocks to the class for reference.
Some of my beloved blocks ❤
6. Break down your process into small steps and document them.
Although I’m still relatively new at block printing, I’ve had many practices so far and no longer have to think about the steps when I block print.
So when I was working on a block printing project for Valentine’s earlier this year, I paused every so often and documented every step. I actually got a blog post out of it, so that was even more awesome 🙂 (You can read it here. )
While I was working on it, I tried to put myself in the shoes of someone who’s not familiar with the tools or processes at all. I also read a bunch of how-to articles on block printing to learn what processes others followed and tried to see if I was missing anything.
Having a documented step-by-step process also helps ensure that your students are getting a consistent instruction.
I also take notes while teaching the workshop on where students get stuck or have a hard time understanding my instructions so I can improve my teaching for the future workshops.
7. Have all the supplies ready and make sure they work!
When I was planning for the workshop, I wrote down every single item we were going to need for the workshop and researched where I could get them at a cheaper price.
I set a goal to at least order everything a month before the workshop date. That way, if something goes wrong or the shipment gets delayed, ideally I’d still have time to fix the issue… 😀
AND, when you get your supplies, make sure to open the package and see if they actually work. I learned the lesson the hard way with the linocut tools I ordered.
They came on time, and I assumed they were all fine. But the day before the workshop, I decided to take the tools out of their individual box and assemble them just to make sure it came with all the parts necessary.
And I found out 3 out of 8 tools had defects and didn’t work!
It ended up working out OK because I’d ordered extra (another important point!) and at that time, I had 5 students signed up for the workshop. But I certainly didn’t enjoy that “oh sh*t” feeling the night before my first workshop 😀
8. Provide resources and handouts.
I wanted my students to get as much value out of the workshop as possible since they’re paying to spend a day to learn something.
So I put together a packet for each of them to take home. It includes materials list, where to get exactly the same tools and materials we’ve used in the class, overview of the steps, tips, and other block printing resources.
After they learn the basics in my workshop, I want them to go home with confidence and continue exploring the craft on their own.
With the well-organized handouts and resources, my hope is that they will!
9. Walk around and check in with each student during the workshop.
This workshop is pretty hands-on, and students spend majority of their time working on their own project.
Some students are more vocal about their needs than others, and it’s easy for me to know what they need and help them.
I also try to check in with other, quieter students just as often – not because I don’t think they’re doing a bad job, but sometimes people are shy about asking for help, or they might otherwise don’t catch potential problem areas before it’s too late.
For this purpose, and since I’m still learning, I keep the class size pretty small (max. 6 students). I like the intimate environment a small class creates and believe it provides a better learning experience for my students as well.
10. Ask for feedback and testimonials. And don’t forget to take photos!
At the end of the workshop, I hand out a short feedback form. I ask a few simple questions, like what they enjoyed the most, what could be better, and if they’d recommend the workshop to their friends and family.
I also ask if I could use their feedback in my marketing materials, and most of them would say yes.
When the students enjoy the workshop and are excited about what they’ve just created, they are much more likely to give you a great testimonial. And including the question in the feedback form makes it more convenient for both of you!
Your students can also give you great ideas about what other workshops or services you could be offering. For example, a couple of students in the last workshop asked if I’d be offering any “second stage” block printing class or an open studio. And maybe private group sessions for adult birthday party! How fun!
I also try to take photos during the class (with their permission, of course) so I could use them for marketing/promotional purposes. It’s so fun to share the amazing work they do with the world 🙂
11. Send them thank you message.
Finally, a day or two after the workshop, I send a quick email thanking them for their participation and share the photos I took during the class.
I let them know they can contact me if they have any questions in their future block printing practice.
If they indicated on the sign-in sheet that they’re interested in joining my email list, I subscribe them so they can stay informed about my future offerings and updates.
I indeed learn so much by teaching!
And I LOVE it 🙂
I feel so lucky to be given this opportunity and am looking forward to teaching more in the future!
p.s. If you’re in Seattle area, you can join one of my workshops this summer 🙂 Check out the class schedule here.
Many artists make their art prints in-house using a high-quality printer. But not me.
I only have an old school cheapo printer at home, and that is definitely not gonna cut the mustard for fine art reproduction.
I’m not ready to invest in a high-end printer yet, so I’ve been relying on professional printing services.
I’ve considered using print on demand services (and I actually have tried selling on one of the platforms), and although there are many pros for using those services, like not having an upfront cost to have an inventory, it’s a little harder to control your customer experience.
With printing yourself or having them printed professionally, you’re able to see the quality of the prints, decide how your print is being packaged and shipped, and add a little personal touch to each order. For instance, I add a personal note to every order I ship out and often include a little freebie, too 🙂
Although you have to make an investment up front, I like being able to build a relationship with my customers directly.
I’ve worked with a few different companies in the past but was never quite happy with any of them for one reason or another.
I needed to find a professional and reliable fine art print shop who can offer good quality giclee prints with reasonable price points and a good customer service.
After spending many hours researching, both locally and nationally, I found FinerWorks.
FinerWorks is a fine art and photography printing company based in San Antonio, TX. When I read the information on their website, their services seemed to match what I was looking for.
So, I ordered a few giclee prints to try out and was impressed with the quality of their products. And I haven’t looked back ever since!
I wanted to tell you about them in case you’re looking for a good fine art printing company, too.
Read on and learn why I recommend them!
1. Great paper selection
I’ve used their Fine Art Paper Velvet and Premium Giclee Paper. They’re both great for the kind of artwork I create. I like the velvety texture of the Fine Art Paper Velvet, and it works really well with my line art work. I particularly enjoy how the black turns out so rich on this paper.
The black comes out super warm and rich on Fine Art Paper Velvet. It was perfect choice for my Cat Violinist sumi ink drawing.
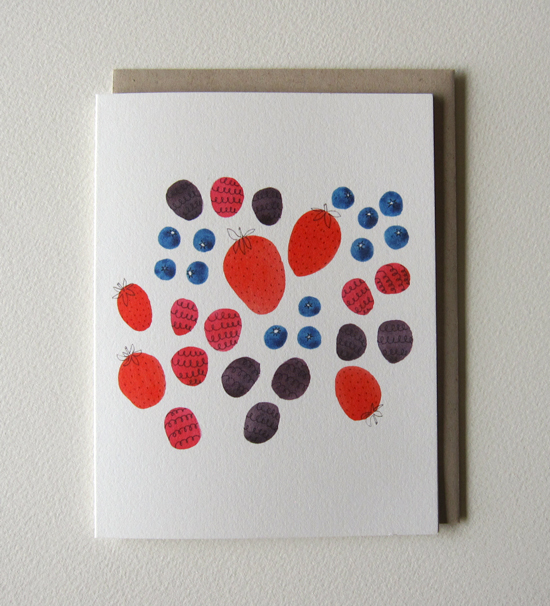
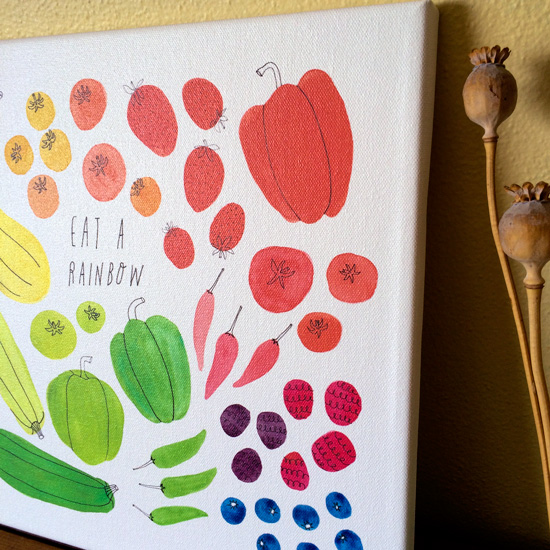
I just tried their Premium Giclee Paper for the first time for my Eat a Rainbow Collection and absolutely loved it. It’s got more distinct texture compared to the first and creates a very nice look for my watercolor art.
They offer a sample starter kit so you can see the actual papers they use. It also comes with a $20 gift card, which is nice 🙂 You can order it here if you’d like!
2. Archival giclee printing
I’m no tech wiz. I don’t really understand the details of how giclee printing works and why certain printers/inks are better.
But theydo.
I look at this and think, um, it looks better than my original! 😀
It definitely shows in their work, and I appreciate not having to worry about that stuff!
When I sell my art prints to my customers, I can rest assured that I’m offering a top-notch products that are going to look great for a long time!
3. Quick turnaround time & great customer service
They have a pretty quick turnaround time for production (typically within 3 business days, I think), so I don’t have to wait forever to receive my prints.
As much as I try to support my local business, I also don’t hate getting my prints shipped to my house. It saves me my precious time for sure!
I’ve always gotten a quick and courteous response from their customer service team as well when I needed help.
4. Great price points even if you place a small order.
Since I don’t have a ton of money to invest in a huge inventory at this point, it was important for me to find a printer who doesn’t require a certain minimum order or charge a lot for smaller orders.
Of course, the unit price gets better if you order more, but I find their price points to be still pretty economical even if you order 10 or fewer prints.
Their shipping is flat rate (depending on the size and kinds of products), so it’s easy for me to budget for my order as well.
If you’re in the market for a good fine art print shop, give them a try!
While we were on our regular grocery shopping trip, I had a craving for a good dip.
I just wanted to cut up a bunch of vegetables and dip them into something yummy… So I started looking through what they had on their dip and spread shelf.
I’m currently on a gluten, dairy & egg-free diet (Oh and some beans are out for me, too… sad.), and many pre-made dips had one or more ingredients I can’t have.
Yes, I could eat chickpea hummus, but that’s my typical dip of choice, and I wanted to try something new.
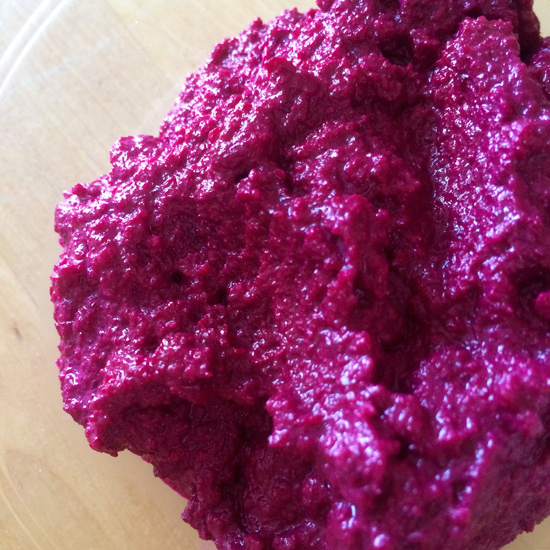
And there it was, I saw this gorgeous, creamy, magenta goodness in an 8 oz. tub on the shelf.
And that’s how I met Beet & Walnut Hummus.
Delighted, I picked up the container and read the label closely. And, congratulations! It was made with everything I could eat!
When I was reading the label, I also noticed that the ingredients were pretty much identical to regular hummus (except for the beets and walnut part).
And then I thought, hmmm, I could probably make that at home!
I took my sabbatical week off during the week of April 18. It’s been a couple of weeks, but I wanted to show you the block printing and sewing projects I worked on.
I take every 7th week off to relax and do things I don’t normally have the time to.
It’s kind of scary to take a week off so regularly, because, I often feel I need to be making $$ and can’t afford to take a time off. BUT, it’s important for me to make the time for reflection and recharge on a regular basis. It’s been one of the best business strategies I’ve taken! (You can learn more about what the mini sabbaticals are all about here.)
Sadly, I’d been sick with a cold for a couple of weeks and was behind on some work stuff, so I ended up working a little bit during my sabbatical.
But I also made sure to do something just for fun!
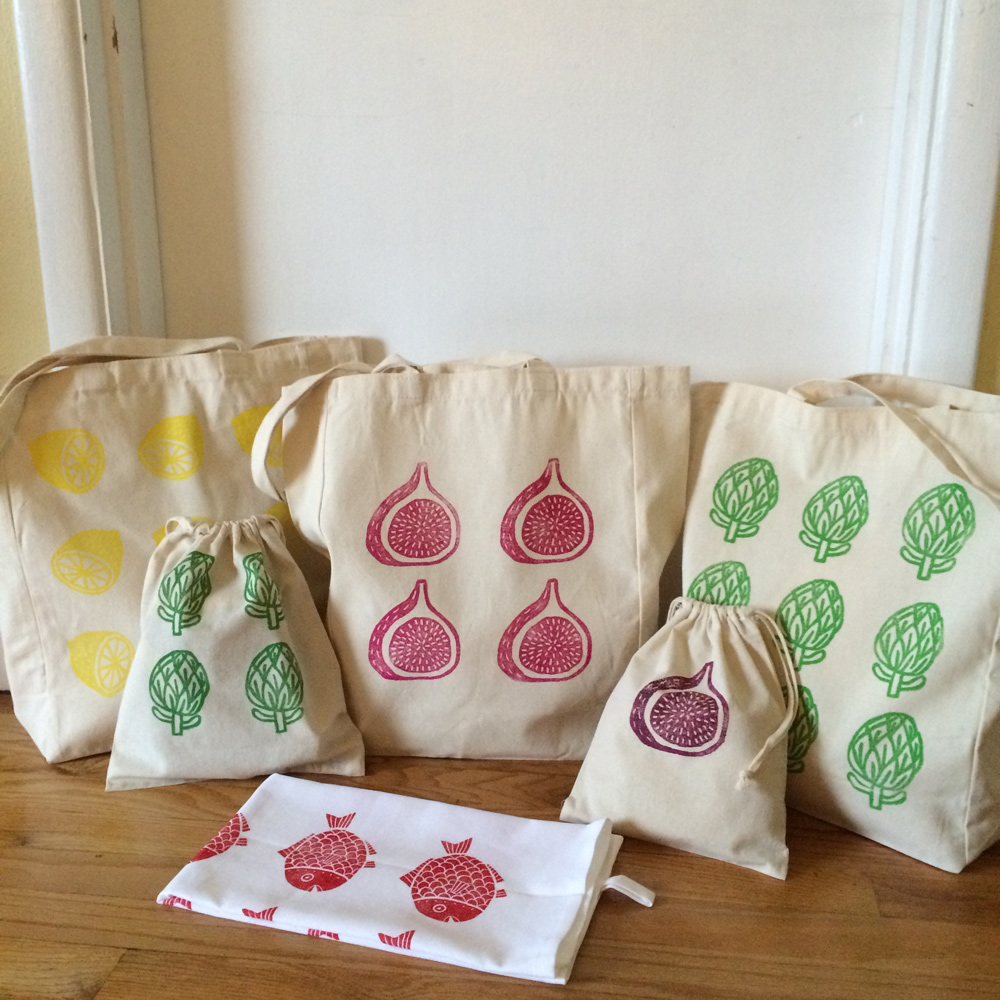
You probably know I’ve been practicing block printing on fabric for a while now.
I love the whole process of designing a block to seeing the prints on the fabric. Time just flies by when I’m engrossed in block printing!
My block printing family 🙂
But I’ve also been feeling a bit burnt out on making block printed products, like tea towels and bags.
Considering all the hard work that goes into it, it’s not very profitable, and frankly, printing the same things over and over got old pretty quickly.
I was afraid I was losing the joy of block printing.
While I continue to focus on developing my art product lines, I’ve been focusing more on producing things that are easily replicable, like art prints and greeting cards, and moving away from block printing for production.
But a lot of people like the block printing aesthetics, so I started teaching block printing on fabric workshops recently at a local art studio, and I really enjoy it!!
Beautiful student work from my first class!
By the way, if you’re in Seattle area and want to join my class this summer, I just posted new dates on my website 🙂
With that being said, I still love to do block printing and want to continue practicing. I think for now I’ll be teaching more and block print for personal enjoyment rather than making products.
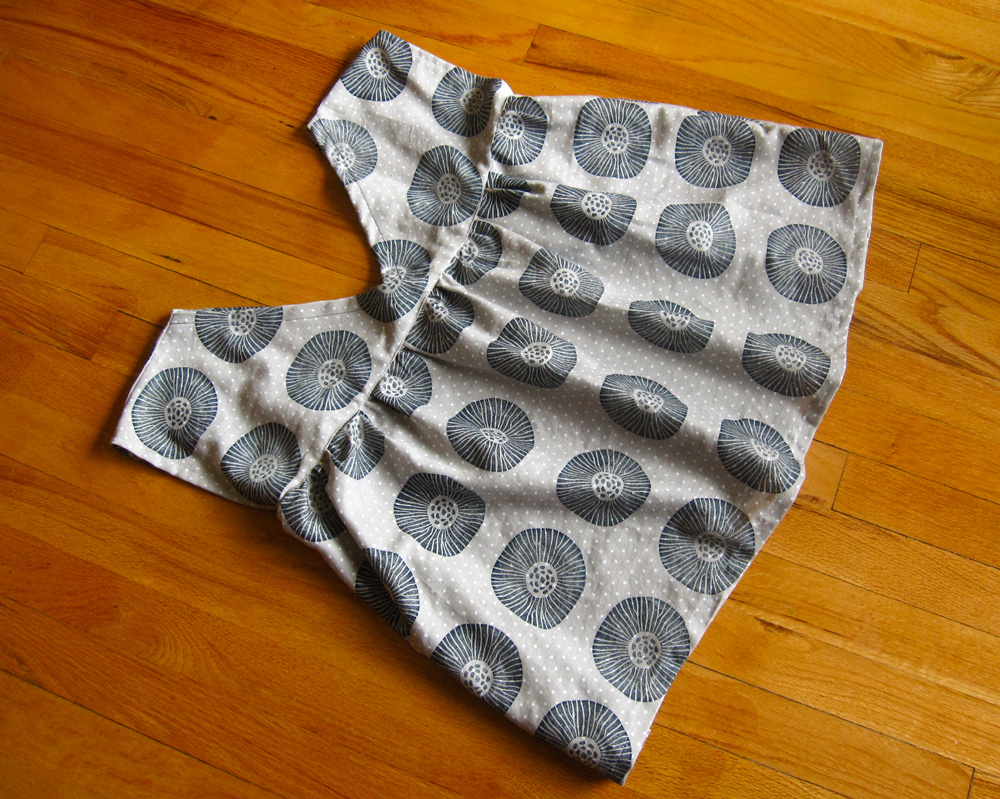
For this sabbatical week off, I decided to make a garment from my block printed fabrics!
I’m not good at sewing – I’d hemmed my pants and made simple tote bags before. But beyond that, it seemed really intimidating.
Sewing a garment seemed particularly challenging because you can’t just wing it, right? You need to follow a pattern, cut the fabrics nicely, and all of your pieces need to match up…
I like to do all of my creative work very loosely and wasn’t confident that I could sew something I’d actually want to (and can) wear!
But, I was inspired by two of my printing/sewing heros – Sarah Golden and Jen Hewett (check out her Print, Pattern, Sew project from 2015 – It’s really gorgeous and inspiring!) and decided to finally tackle this!
Making garments by sewing straight lines? Yes please!
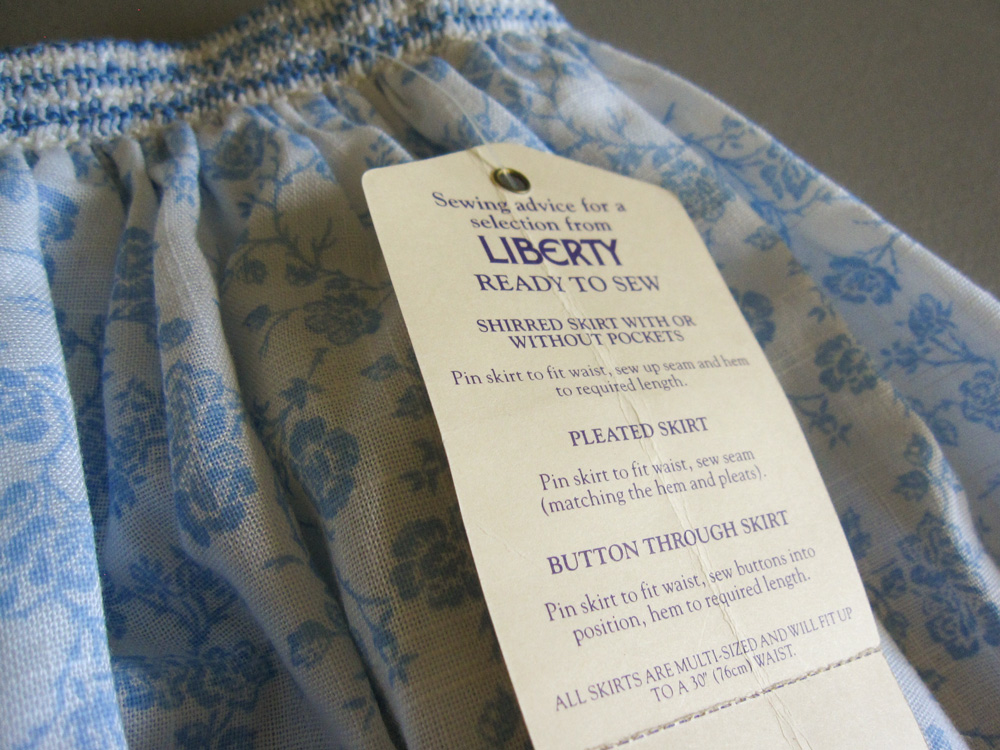
I got this Japanese sewing book, titled “Making Garments by Sewing Straight Lines” several years ago when I was visiting Japan. I was naturally attracted to the title 🙂 and all of the pieces looked adorable. I’d been just admiring the pictures until now and I’m glad I didn’t throw it away!!
I chose one of their patterns for a top that seemed pretty easy.
This one!
I didn’t want to spend a lot of money for the project, so I went fabric shopping at Goodwill as per my friend Sarah’s recommendation. If you’ve never gone fabric shopping at thrift stores, they’re awesome.
I looked around their fabric section, bed sheets, table cloth, and curtains. I saw so many cute fabrics there and was tempted to get them all! But I wanted to start small in case I hated sewing 😀 and bought two fabrics.
I wanted the color and pattern on the fabrics to work well with my block print design, not compete against it. So I picked a simple grey and white porka dot cotton bed sheet and a light weight cotton ready-to-sew blue flower pattern skirt.
And I got so much material for $5 each! Score!
Ready to sew? I like the sound of this…
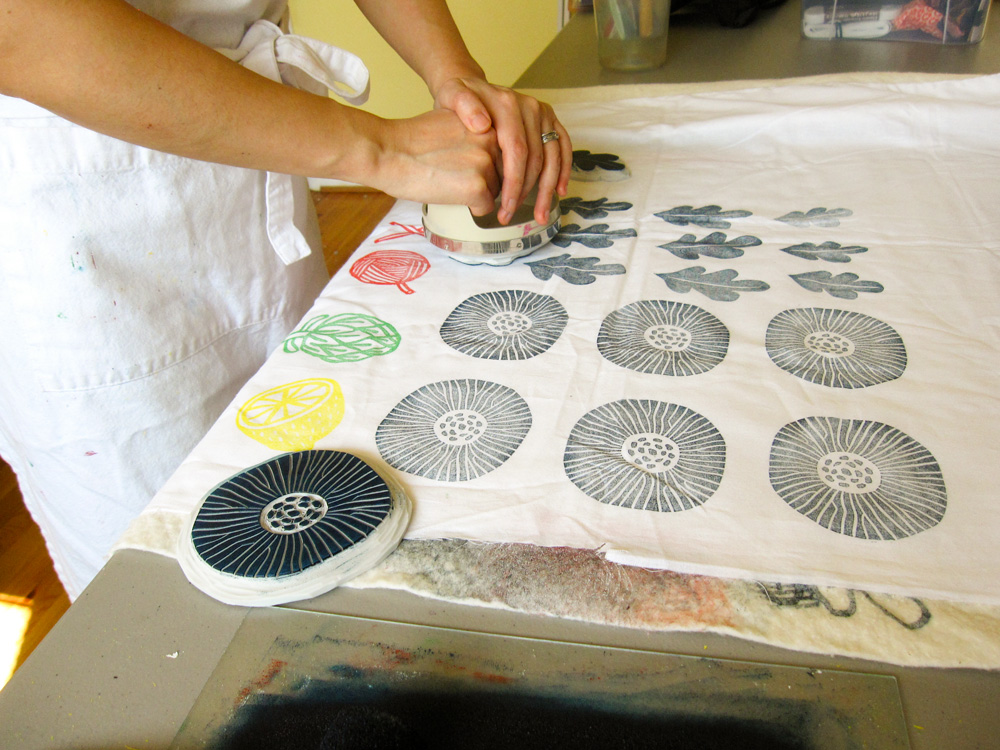
For the block print design, I thought it would be fun to carve my recent obsession – poppies.
Can’t seem to stop drawing these lately…Hand carving poppy & leaves. I use Speedball linocut tool and Moo Carve soft rubber blocks.
After I hand carved the pieces, I test print on a white cotton fabric. This is where I see areas I want to tweak and refine.
Test printing on white cotton fabric. I print with water-based fabric screen printing ink.
Once I was happy with my blocks, I started printing on the actual fabric I was going to make my top with!
For the fabric design, I decided to do just a simple block pattern. I toyed with the idea of incorporating the leaves too, but it just got too complicated… I believe in simplicity!
Printing on upcycled bed sheet from Goodwill
It took forever to print my poppy design on enough fabric to make one top, y’all. Then I had to air dry it over night and heat set with the iron before cutting into it. Phew.
Though I picked a very simple sewing pattern, (and the book promised it was “easy” and “quick”) there were so many little steps, and it was still pretty challenging for beginner like me. I mean, I still can’t sew straight lines, you know? 🙂
But, I didn’t quit and finished my very first hand printed garment!! Ta da!!
My very first block printed sewing project! It’s so cute ❤
And, I love how it turned out! ❤
Not bad, right?❤
Of course I see all the flaws and mistakes, but it’s good enough to wear around the house 🙂 It fits quite loosely, so it would be perfect during the hot summer months.
I just hope it won’t come apart when I wash it in the washing machine… 😀
For the ready-to-sew skirt, it was a lot easier because all I needed to do was to adjust the waist and the length. No pattern required!
I printed the poppy and leaves along the bottom. Honestly, I didn’t have the time or energy to print all over on another big piece of fabric and thought it would be a cute design anyway.
Since this was going to be a more dynamic design, I incorporated the leaves to add visual interest and movement.
I sewed and attached the shoulder strap and made it into a multi-purpose dress and a skirt!
It’s super light weight and again perfect for hot summer days ahead.
2 ways to enjoy one skirt! p.s. Modeling is super awkward… 😀
It was a lot of work but (or maybe because of it) it was also very satisfying to make my own clothes with my hand printed fabrics!
I always had respect for people who can sew, but this experience definitely made me appreciate the craft 100x more!! Bravo, you sewists out there!
I’d love to continue practice sewing and deepen my block printing practice in the future.
And I can’t wait to share my process with you on this blog 🙂
Oh I’m so excited this day has finally come! Drum roll please…
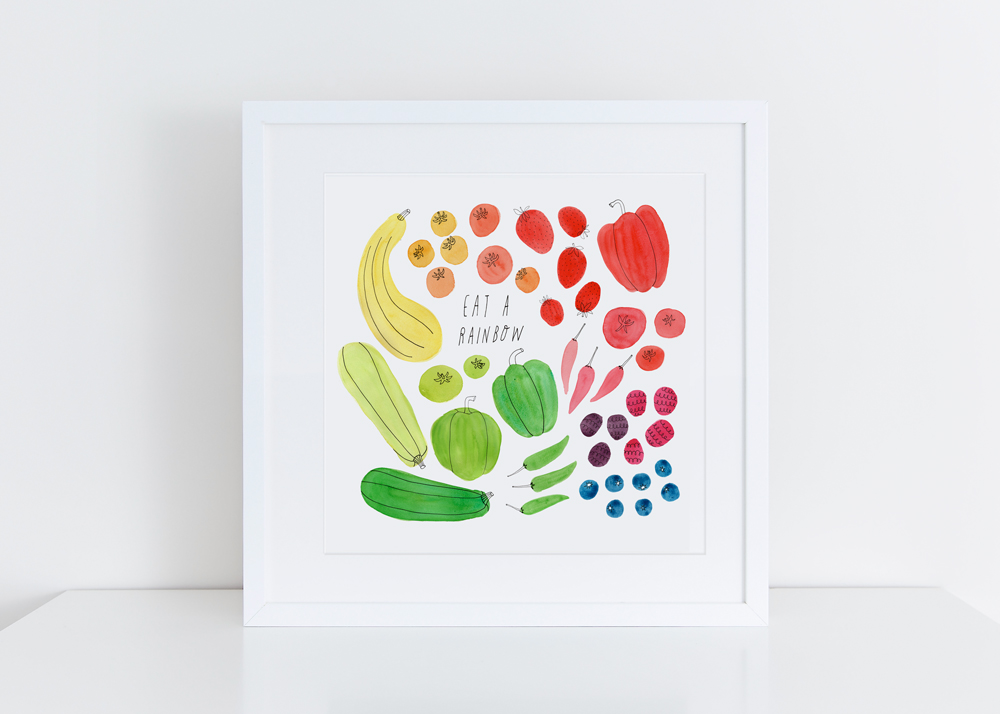
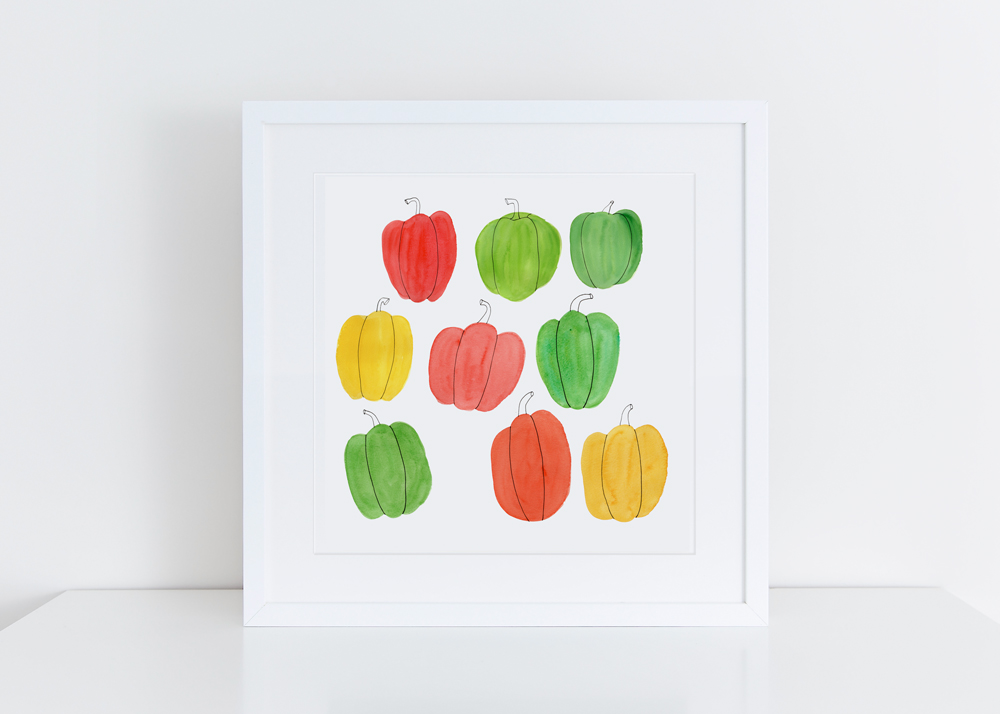
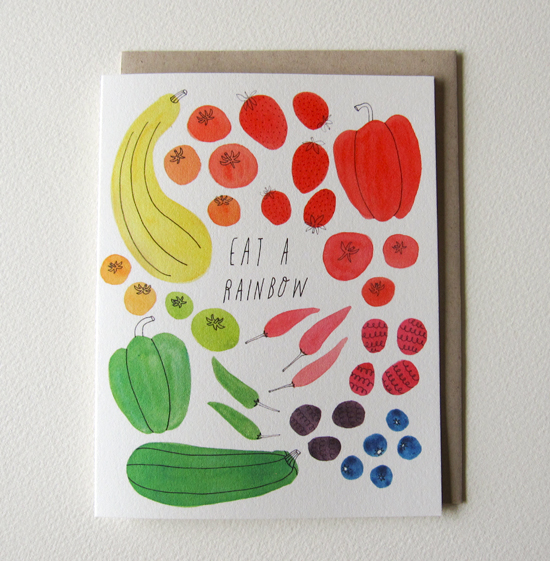
My Eat a Rainbow art collection is available now on my Etsy shop!!
For this collection, I created 4 new designs of art products with a summer garden theme: Eat a Rainbow, Bell Pepper, Tomato, and Summer Berry.
Why the gardening theme? Because eating healthy is one of my passions, and homegrown fresh fruits and vegetables are simply the best!
Growing your food, even if it’s a small portion of what you need, is very empowering. It helps you stay connected to the nature and allows you to notice the beauty that surrounds you every day.
It nourishes you and your family – not only physically, but also mentally and emotionally. And it lets you learn from your mistakes and encourages you to live creatively.
And even though the food goes away once you eat it, the memory and feelings you create with people you share your meals with will last a long time.
My Eat a Rainbow art collection is available to help you create more joyful moments this summer ❤
And you can enjoy them in 3 different product categories. (Note: You can click on each photo below to get directly to the product page on my Etsy shop!)
Let me give you a tour of what’s available for you! Ready?
I decided to add this 12″ x 12″ archival canvas print to the collection. I just simply could not resist having this artwork on a canvas, and it turned out so beautiful ❤
Perfect for adding vibrant energy to your kitchen or to refresh your kid’s room!