I love to eat. And I love to draw what I eat! Surprise!
One of the creative business podcasts I listen to is Seanwes podcast, and he said in one of the episodes that to grow an audience, you need to curate what you share.
He says if you’re an illustrator, don’t be posting a bunch of pictures of your lunch. Instead, you should be drawing it!
That advice stuck with me, and I only shared the drawings of what I ate on Honeyberry Studios’ social media accounts for a long time. (I do share a ton of food photos on my personal account, though!)
I noticed as I made more drawings of food, I became more connected with what I ate.
When you draw what you eat, you take the time to notice the details of what’s on your plate. The ingredients, steps you took to prepare them, the texture, the aroma, the portion of your meal, and of course, the happiness you feel on your tastebuds.
On top of that, food journaling automatically gives you something to draw!
No more staring at the blank page when you’re feeling un-creative 😀 You do eat something every day, don’t you?
Here are some of my more recent food drawings:
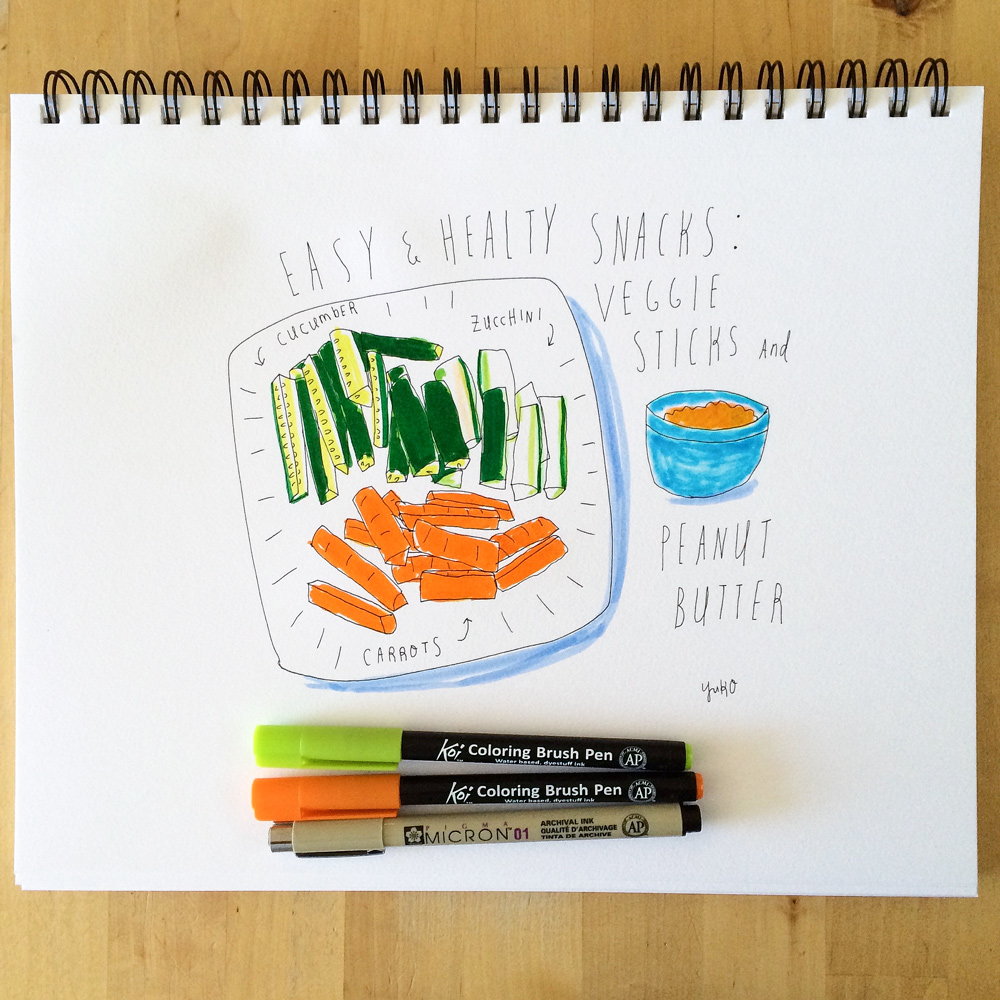
Veggie sticks and peanut butter. A simple and satisfying snack idea!
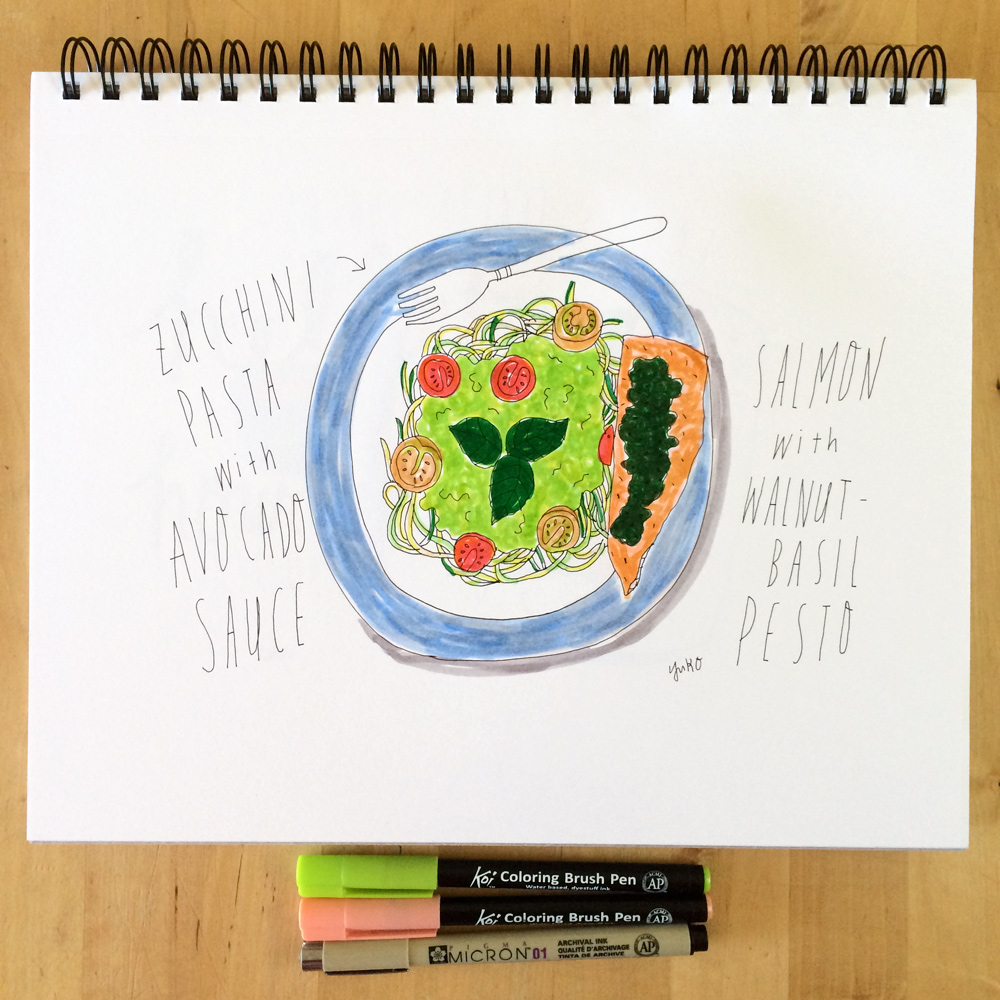
Zucchini pasta with creamy avocado sauce and salmon with vegan walnut pesto. What a refreshing and tasty lunch!
BTW, you can check out the illustrated recipe for the zucchini pasta with creamy avocado sauce here 🙂
I have these phases where all I want to eat is Japanese food. All. the. time. Here is one simple meal I enjoyed the other day.Oh, this Avocado Chocolate Pudding is so decadent and amazing…!! My dairy-loving husband approves, too.
Oh man, these drawings are making me hungry… 😀 I better go feed myself now!
Do you want to learn how to create your own food journal? I created a tutorial for Sakura of America and you can watch it on their YouTube channel here.
It was fun to share the process with my followers and thought you might enjoy a little peek, too!
I usually work with pen and ink on paper. Here is the lettering for the title. I’m using a Pigma Micron pen (black, size 01) and Canson Mixed Media sketchbook here.I have a rough layout in mind when I draw my recipes. Recipes that don’t involve a ton of ingredients and steps are easier to create. And those are recipes I love to cook anyway!I hand write all the texts. I try to make it legible and easy to follow.
Coloring the drawing with my favorite markers: Sakura Koi Brush Pens!
Coloring done! I like to use only a handful of colors to keep it simple. For this illustration, red and orange tomatoes look great against the green tones.
Then I scan the image in to edit/manipulate it in Photoshop. This is why I don’t stress too much about layout and mistakes when I draw my recipe on paper. Thank you Photoshop 😀
And it’s ready to post! Hooray!
Hope you enjoyed my behind the scenes creative process today 🙂
p.s. I’m leaving for Japan tomorrow to visit my parents for two weeks 🙂 I’ll be taking a break from my blog next week but will give you my travel report when I get back!
I’d been dreaming about having a spiralizer for a while now. I try to avoid refined carbs as much as I can, and a spiralizer would make it easy for me to substitute pastas and noodles and add more veggies to my dish.
Dave got me this spiralizer from Paderno as an early anniversary gift! And I’m so in love ❤
It’s been super hot here, and our apartment overheats really easily, so I’m happy to have recipes that don’t require me to turn on the stove after, like, 10am.
It was really easy to assemble and use the spiralizer. Making my zucchini noodles was a breeze!
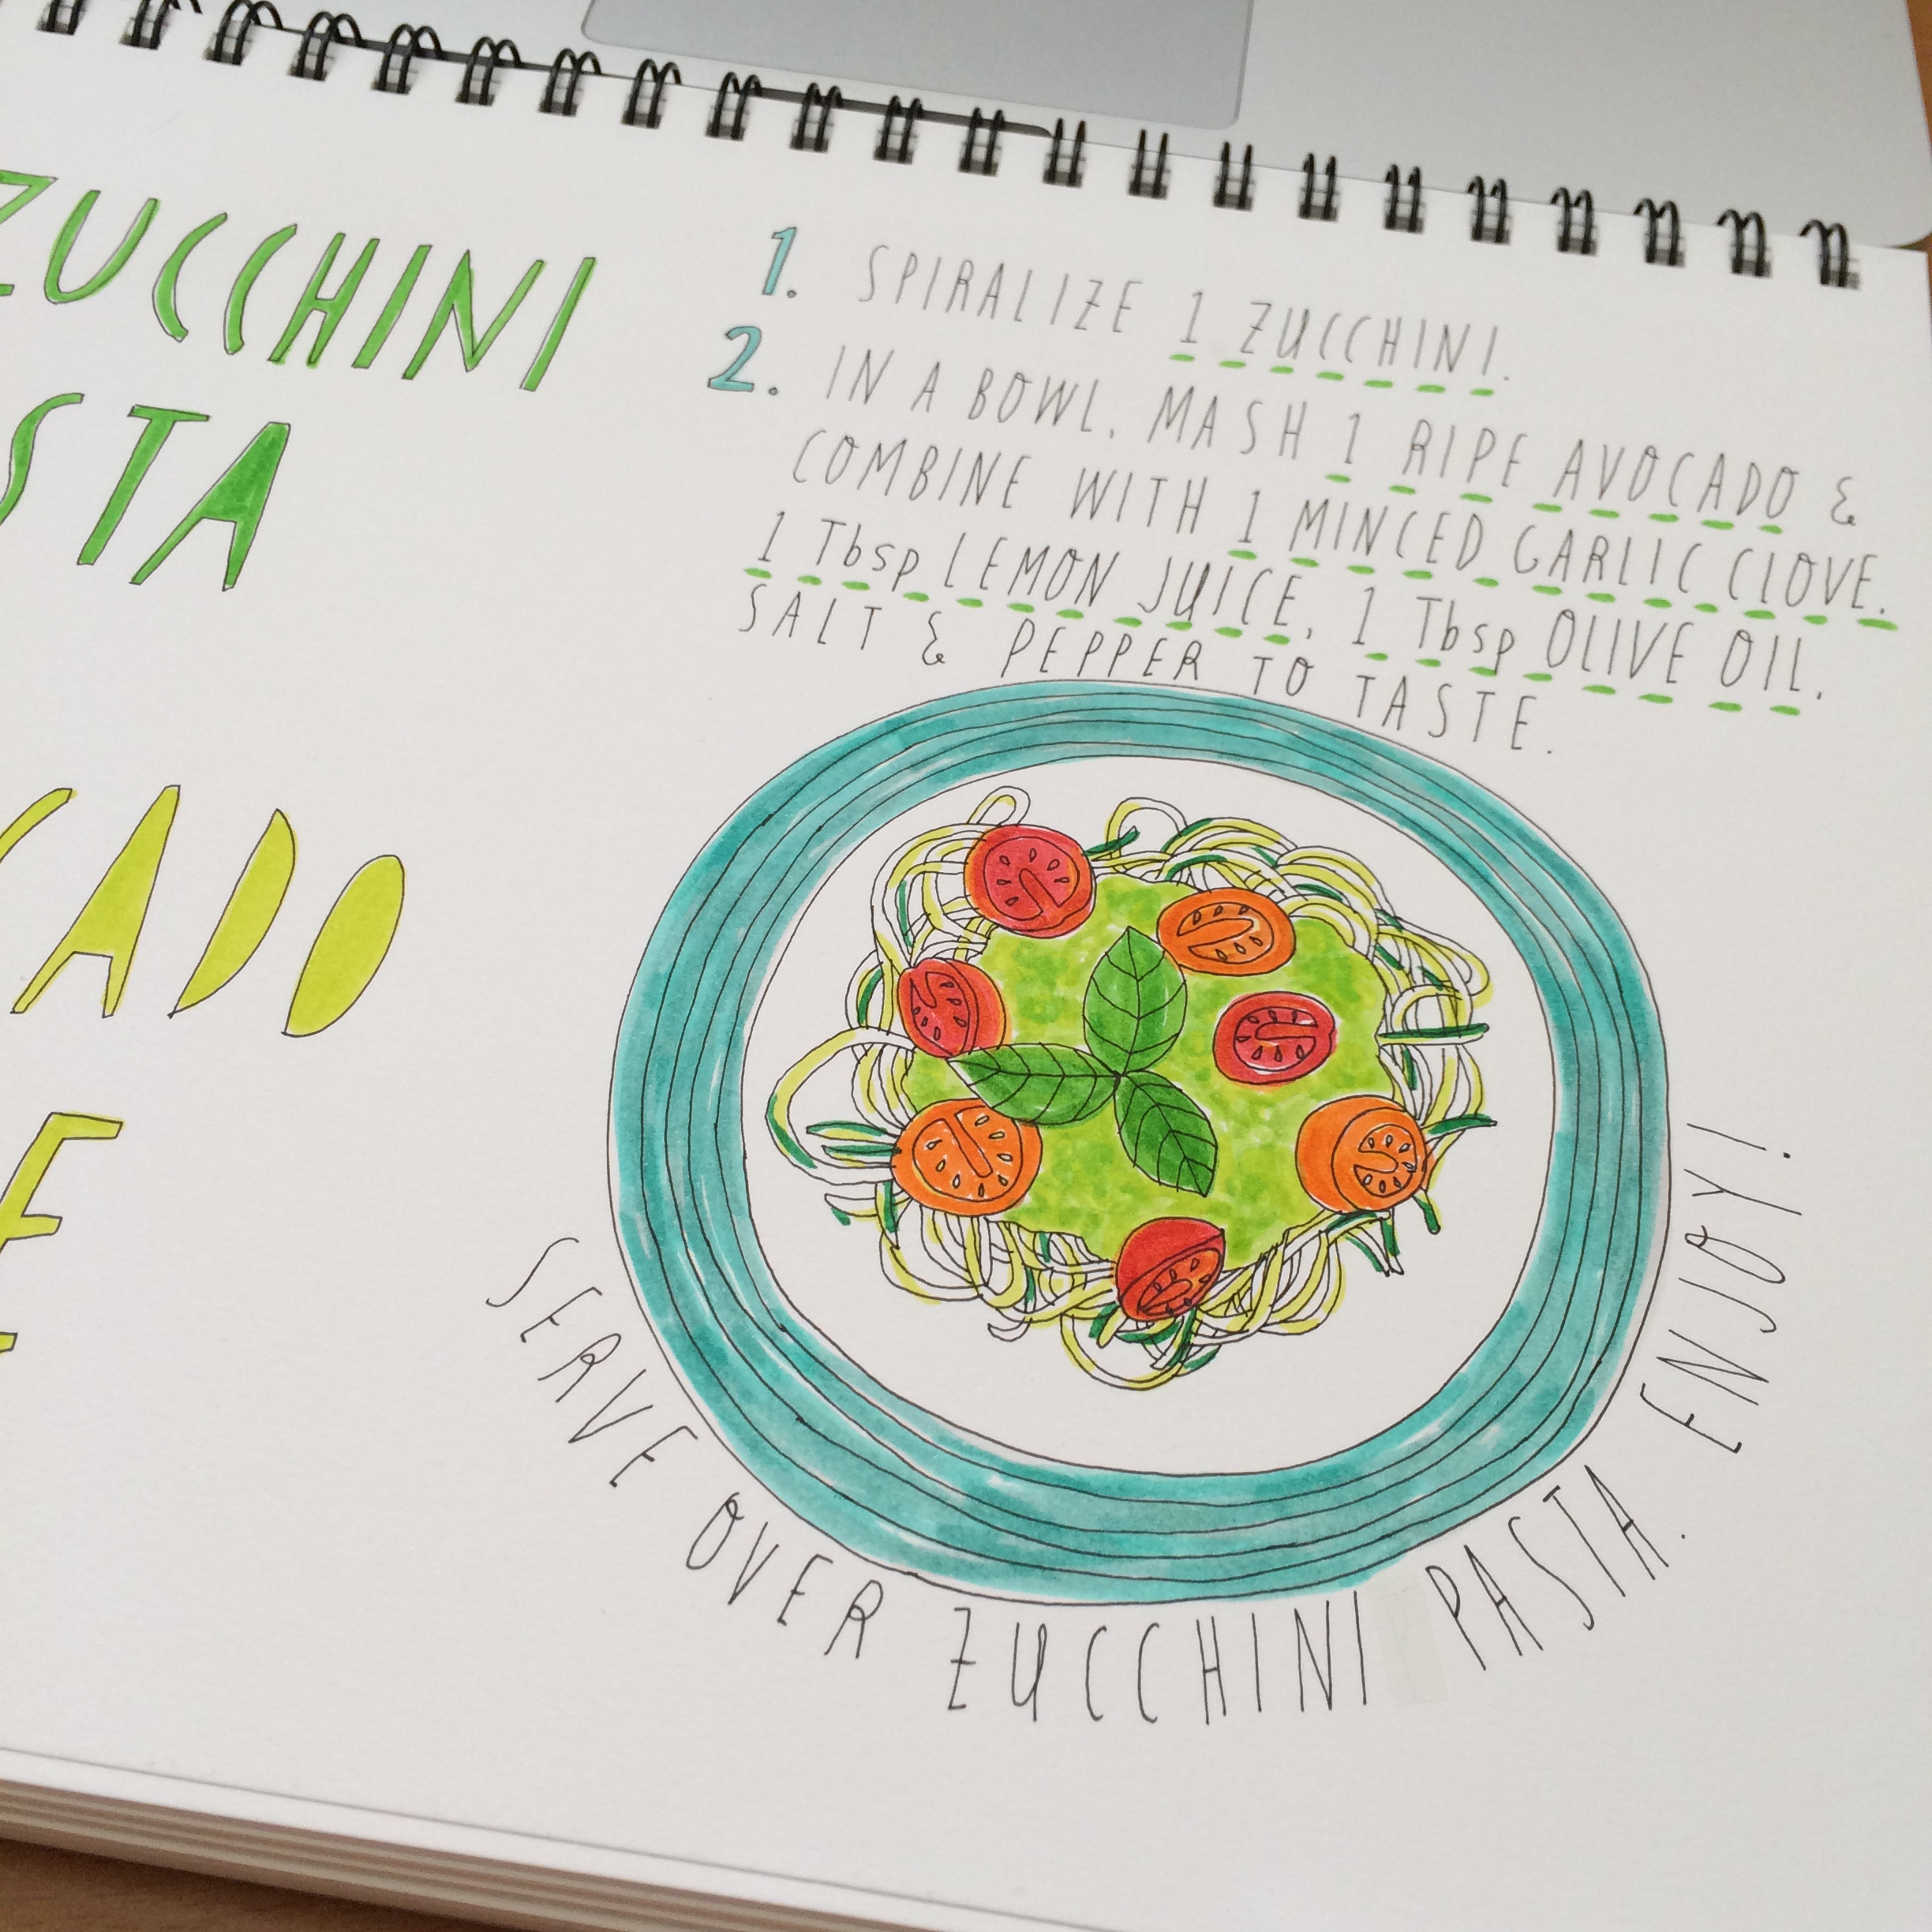
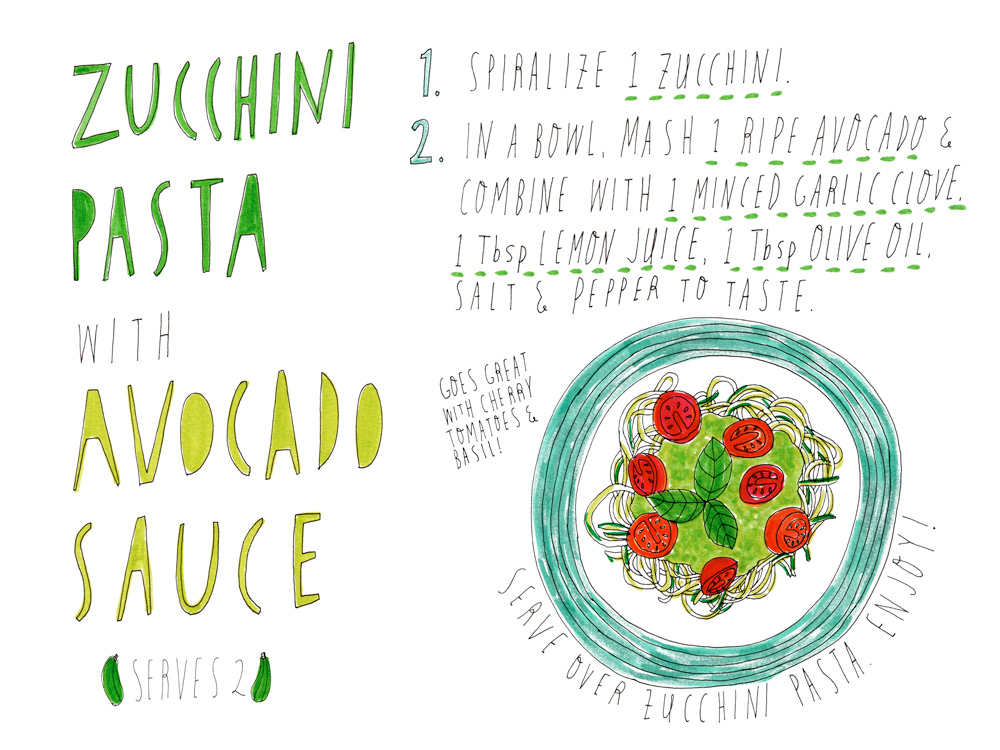
This recipe is so simple. I was eating my zucchini pasta with avocado sauce within 10 minutes.
Zucchini Pasta with Creamy Avocado Sauce. It’s a light and tasty dish perfect for summer lunch!
I had a bunch of cherry tomatoes and basil from our gardens, and they made a nice addition to this cool summer dish.
So refreshing and healthy!
It was so good, I practically inhaled it!! 😀
There will be more spiralizing happening in my future for sure! Do you have any favorite spiralized vegetable recipes? If so, please share in the comment 🙂 I’d love to hear!
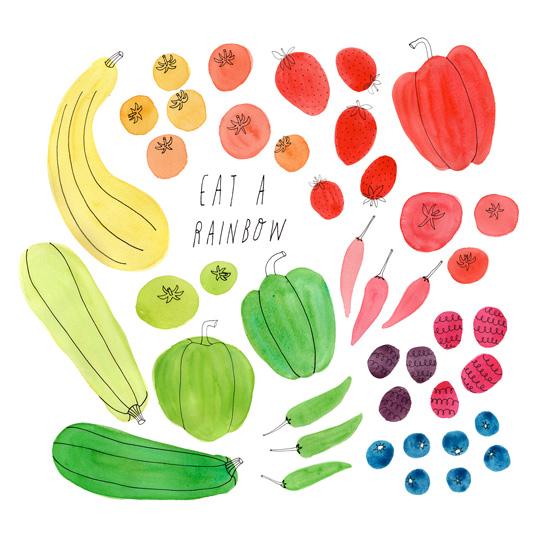
I love to cook with seasonal fresh ingredients. During the summer, our gardens provide us with abundance of summer veggies, like cucumbers, eggplants, tomatoes, and of course, zucchinis.
Summer is here!! Eat your rainbow every day 🙂
I’m always looking for creative ways to eat zucchinis because they usually come in such abundance.
I have a few go-to zucchini recipes, but I get bored of them after a while… 😀 And before you know it, your crisper gets so full of them! You can’t fit anything else in there, and when you try to jam in your lettuce, they end up getting smushed by the firm zucchinis. I’m sure I’m not the only one who occasionally resents how prolific they are!!
During the summer our tiny apartment gets overheated due to the big west facing windows and the subpar insulation. We try to cook outside on our BBQ grill whenever possible so we don’t have to turn on the oven or the stovetop.
I was delighted to find this raw zucchini hummus recipe on The Detoxinista because 1) it uses the zucchinis raw and 2) I love hummus!
(BTW, I love The Detoxinista so much! Probably my #1 favorite cooking/recipe blog right now. Everything Megan posts there is pretty easy to make, and it gives great options to accommodate many food allergies/sensitivities!)
Bean-free raw zucchini hummus recipe from detoxinista.com
I have allergy to several kinds of beans, and chickpeas, depending on how they were prepared, are sometimes hard to digest… so this zucchini hummus is a great bean-free alternative!
It’s light and refreshing and goes great with your favorite veggies and crackers! YUM.
And I love how easy it is to put together. Just chop up the ingredients and blend them together! That’s my kind of cooking… 😀
What’s your favorite zucchini recipe? Tell me in the comment below and help me keep up with our zucchini production this summer!!
(OK, not really – I’m writing this post before I left for my 10-day meditation retreat…and am just about done and getting ready to come home when this post comes out :))
Anyway, I’ll tell you more about how my meditation retreat went next week. I promise.
For now, you can assume it was ________________ (fill in the blank: life-changing, awesome, terrible, hard, boring, enriching, deeply insightful, painful, healing, waste of time, so worth it, tiring, etc. etc.)
Since I don’t have much to say about my meditation retreat yet, I wanted to share a recipe for Metta Balls today!
What’s a Metta Ball, you ask? Metta is a term used in Buddhist teaching, meaning “loving kindness.” Metta Ball is a no-bake, nutty and sweet treat that is super easy to put together and of course, so very good.
Meal time is definitely a highlight of the meditation retreat when all you do is sit and try to observe your inner chatter all day long.
And every once in a while, they serve you a dessert. Metta Ball is one of their dessert options.
At the time I’m writing this post, I’m really hoping they serve it at the retreat! With my current dietary restrictions, this is pretty much the only dessert I can eat out of all of their options.
I know I’m supposed to let go of my desires and wishes during the meditation… but desire for a good dessert is probably the last thing I’ll let go of 😀
Be warned – it’s addictive.
When I made these a few weeks ago, I kept peeking in the fridge and reaching in the tupperware, like every 20 minutes. This little treat goes perfect with milk. Or rather, you need milk to wash down the peanut butter that sticks all over your teeth 😀 He he.
While we were on our regular grocery shopping trip, I had a craving for a good dip.
I just wanted to cut up a bunch of vegetables and dip them into something yummy… So I started looking through what they had on their dip and spread shelf.
I’m currently on a gluten, dairy & egg-free diet (Oh and some beans are out for me, too… sad.), and many pre-made dips had one or more ingredients I can’t have.
Yes, I could eat chickpea hummus, but that’s my typical dip of choice, and I wanted to try something new.
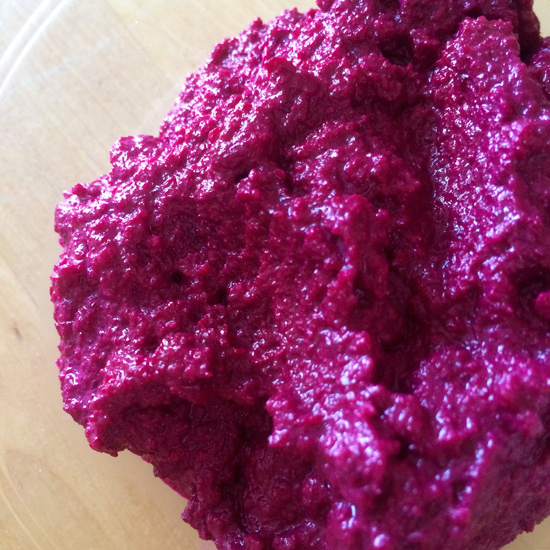
And there it was, I saw this gorgeous, creamy, magenta goodness in an 8 oz. tub on the shelf.
And that’s how I met Beet & Walnut Hummus.
Delighted, I picked up the container and read the label closely. And, congratulations! It was made with everything I could eat!
When I was reading the label, I also noticed that the ingredients were pretty much identical to regular hummus (except for the beets and walnut part).
And then I thought, hmmm, I could probably make that at home!
I’ve been dealing with a few different digestive issues lately and discovered that eating small meals and munching on snacks between meals help me feel good physically and mentally.
There is a Japanese phrase, “eating until 80% full,” as a good practice for your digestive and overall health. I guess it’s kind of a common sense that overeating is not good for you, but I’ve become more aware of it as it relates to my own health lately.
When I snack (and I LOVE to snack), I try to eat whole foods that are nutritionally rich and filling. I’m a very practical person, and if I can eat only a small portion of food at one sitting, I want more bang for the buck!!
Meet avocados.
I love avocados. I’m sad that we can’t grow them here (who knows what’ll happen in some years with the climate change and everything…?) but we buy them regularly because they’re SO GOOD.
I love its creamy texture and how versatile it is. It’s packed with beneficial nutrients and vitamins (you can learn more here) and goes with practically everything. And the “good” fat and fiber it contains allow me to feel full even if I eat just a small amount of it.
Easy & Healthy Avo Toast Recipe
This Avo Toast has been my go-to snack between breakfast and lunch lately. The buttery, creamy avocado with a hint of refreshing lime juice and a tiny bit of sea salt on a warm, crunchy toast is simply divine.
And it only takes 5 minutes to prepare, if that! I’m always looking for a recipe that takes only a handful of ingredients to make (I often get turned off when I see 7 or more ingredients in a recipe…:D), and this Avo Toast recipe is definitely a keeper!
I’ve been little obsessed with buckwheat breakfast porridge lately.
Buckwheat is awesome. It’s super nutritious (very rich in fiber and protein as well as Vitamin B-6, Iron, and Magnesium among other things), and is a good option for breakfast hot cereal if you’re on a gluten or grain-free diet. Despite its name, buckwheat is not a wheat or grain. It’s actually a seed!
I get toasted buckwheat groats in a bulk section of our natural grocery store. I love the nutty, earthy flavor so much ❤
I use unsweetened soy milk for extra protein, and you could substitute it with other non-dairy or dairy milk, of course.
Some chopped walnuts and cinnamon are also good for this recipe! Or add some nut butter…mmmm. I just enjoy the natural sweetness of the fruits in this recipe, but you can definitely add sweetener of your choice if you’d like. Possibilities are endless!
I make my hot cereal/porridge pretty mushy to make it more digestible, so if you want it less mushy, you probably want to adjust the cooking time. Also, pre-soaked groats will cook quicker, so be sure to check after a few minutes if you don’t want yours too soft.
I hope you enjoy this simple and hearty breakfast!
The other day, I had a craving for delicious marinated tofu. So I went online and searched for a good, simple recipe. I think this recipe came up at the top – I had all the ingredients at hand and was craving for some Japanese-y, Asian flavor, so this was perfect!
It was super easy to prepare (which is very important to me… I’m a lazy cook by nature.) and delicious! I served it with some rice and veggies, and Dave and I just devoured it like there was no tomorrow.
Definitely making this again! Hope you’ll enjoy it, too!
As I’m redirecting my art biz goals this year and subsequently expanding the scope of this blog a bit to bring you more inspirations for creative and happy living, I thought it would be fun to share some of my other creative projects I’m working on from time to time. I always enjoy it when other artists share their non-work-related creative projects, so I hope you’ll enjoy mine, too 🙂
I’m sure many of you creatives can relate, but I like doing/making stuff from scratch (or as “from scratch” as possible). I find it so satisfying and empowering to learn to make something and do it myself. I know it’s not always practical to do things myself, but at least I learn how to do it, and I appreciate having the knowledge.
I’m particularly excited about DIY-ing when it comes to eating healthy. I’m passionate about eating organic, fresh, whole foods as much as I can. Maybe it’s because I’m becoming middle-aged, but I’ve been noticing more and more the effects foods have on my physical and mental well-being. I’m learning to listen to my body more and becoming more proactive about taking care of myself.
I can’t create inspiring and joyful art if I’m not well mentally, physically, or emotionally, you know?
A fun Northwest themed book cover I worked on a few years ago.
I’ve been learning more about food and nutrition and trying different ways to incorporate more healthy eating habits in my everyday life.
So today, I wanted to share with you how to soak nuts for healthy eating. Enjoy!
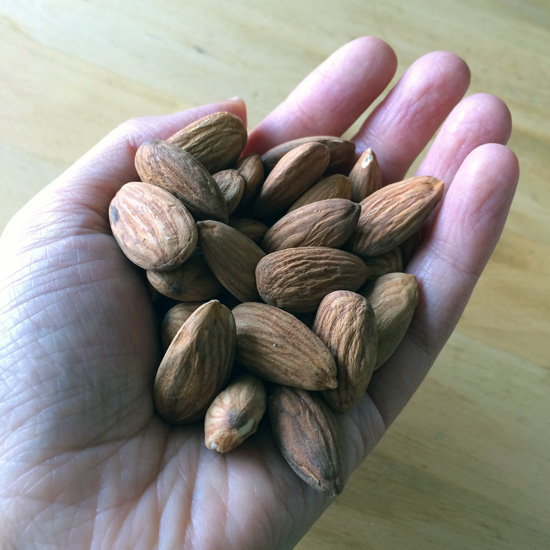
First of all, let me confess: I’m nuts about nuts. I’m especially nuts about almonds. It’s kind of an addiction… They’re great snack packed full of beneficial nutrients and taste SO good! Mmmmm.
As much as I love them and want to keep eating them all the time, sadly, my body doesn’t digest them very well, and I’ve noticed weird taste in my mouth if I eat a lot of them. Yuck.
I’ve been reading about nuts and learned that there are some toxins that are present in nuts, seeds, and grains to protect themselves, and soaking them will help remove the toxins and will help make it more digestible in human body. (Just a disclaimer: I’m no nutritionist and haven’t done any extensive study or anything. I got a ton of information about how to soak nuts, seeds, and grains and nutritional benefits of it on this website in case you want to learn more!)
We usually buy our nuts in bulk at our grocery store, but they don’t carry organic soaked almonds there. So I decided to soak almonds myself and see how they turn out!
Here is an illustrated recipe of how to soak and dehydrate almonds!
Information from healthyblenderrecipes.com. Note: you don’t need to dehydrate them if you’re using your almonds for soups or dips right away.
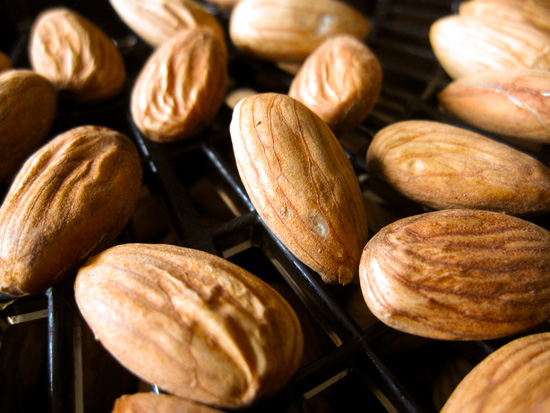
Here are some actual photos from the process.
These almonds had been soaked for a few hours already, and you can see the gunk in the soaking water already.You want to soak them in filtered water (about 2x volume of nuts) with a tea spoon of celtic salt dissolved in it.Cover the bowl with a thin flour sack cloth or other breathable cloth. My 100% cotton block printed artichoke tea towel did a perfect job!After soaking them for about 24 hours, I drained and rinsed them throughly. Then I put them in the dehydrator to dry.They were dried in the dehydrator for about 24 hours. Then I turned them off and let them cool/dry for another 12 hours or so.
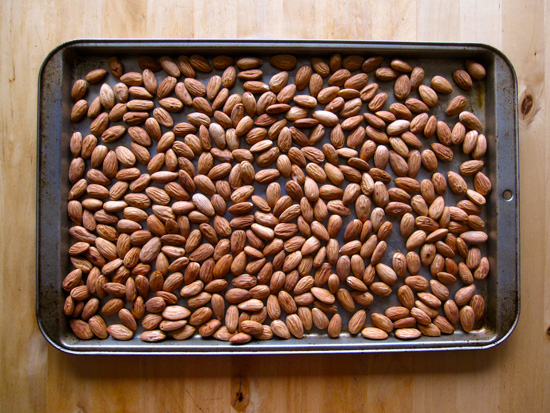
This is an extra step, but I love roasting nuts! I think they taste so much better when roasted. So crunchy and extra nutty.
After the nuts were completely dehydrated, I roasted these in a baking sheet at 350°F for 10-15 minutes. You need to check/stir occasionally to make sure they’re not burned. When they burn, they burn very quickly and will continue to burn even after you take them out of the oven! I had an unfortunate accident a couple of times before 🙂 I listen for the crackling sound and the aroma of almonds and pull them out when I start hearing/smelling them.
Ta da!
I must say, it was kind of a lot of work just to eat some nuts, but I’d imagine it’ll become less of a hassle if I do it more often and it becomes a routine. I hope it makes a positive difference for my system!