I turned my calendar page to July and felt so seen 😭
Sigh.
You may be having a similar struggle as I am… Facing big problems and holding hard emotions without clear answers or timelines.
There is so much urgency. So many fires to put out, and they seem to be spreading despite your effort.
It’s overwhelming and exhausting.
I totally hear you.
I’m so with you.
That’s why this month’s calendar message resonated with me so deeply.
You’re doing the best you can with what you have💜
What we’re facing today are a direct result of unjust systems that have been created and maintained over hundreds of years.
Let’s be honest that most of the problems will not be solved over night. Or even a year. Maybe not even in my lifetime.
Here is the thing.
We’re not aiming for perfection.
Progress is what matters.
Our individual progress may be small. But we, you and I, have to continue our best effort for as long as it takes.
So by the time we leave the earth, our world is closer to the vision we’re working towards.
Are you with me?
With that being said, I want to share the progress on my anti-racism work since my last email in case you’re looking for some ideas for yourself👇🏼:
★ Updated my Day 1 email for the “100 Brighter Days” email series to incorporate my intention – my messages are applicable not only for our challenges with COVID, but also in our anti-racism work.
★ Updated my about page to state my anti-racism values more clearly.
★ Watched Small Business Reimagined Town Hall – If you haven’t watched it yet, I highly recommend it! It’s free and you’ll get so many helpful ideas to make your biz or workplace more anti-racist.
★ Continue to learn/reflect/take small actions through Anti-Racism Daily email with Nicole Cardoza.
★ Checking in with suppliers/manufacturers re: their anti-racism values. Replacing the ones who support systemic racism (ULINE 👎🏼) with new partners who are doing the work.
Many of these items turned out to be more time-consuming than I expected, so it’s slow going. There will be on-going follow-ups and adjustments as I learn more.
I’ll be happy to share my learning and progress in my future emails and would love to hear what you’re working on, too.
Now – some shop updates for you 💌
I created several cards and gift bundles for a virtual popup in May, and it was a lot of fun 🥰 so I’ll be bringing them to my webshop!
These classes are kept pretty small and will fill up, so sign up early! Tuition goes up on Tuesday, September 24. (hint: best value if you sign up with a friend 👯♀️)
let me know if you have any Qs. Hope to see you there 😉
If you’ve been wanting to sign up for it, now is your chance. I have a limited seat available and I’m 99% sure this is the last one I’ll teach this year.
It’s gonna be on Sunday, October 28 from 10:30am to 3:30pm at IGIMO Redmond.
If you love learning new crafts in a supportive, casual environment, this workshop is for you! 😊
xo
p.s. I plan on offering an open studio time to my students sometime before the winter holiday season so you can work on your handmade gifts. However, I may not offer another workshop until next year. FYI!
I love teaching the class and get so inspired by all the beautiful student work!! Here is a fun picture from my last workshop… 🙂
I’ve been thinking about offering a workshop that’s similar but a little more accessible.
Though block printing tools and materials I use for the class are super easy to handle (no linocut or wood block because they’re tough for beginners), I think some students are still intimidated by the idea of carving a block.
So I picked up this gorgeous book by Andrea Lauren recently to learn about stamp making using art foam sheet, which requires no carving.
First of all, this books is beautiful! Her work is amazing and often very intricate – but she shares step-by-step instructions on how to create your own stamps and blocks in a very user-friendly way.
I became interested in the art foam stamp making because it requires no carving and is great for beginners or those who just want to experiment with block printing.
So as soon as I got my book, I created my own stamps using art foam sheets and documented the process for you!
1. Sketch your design for the stamps.
I wanted to design something pretty to print on an A2 size greeting card (4.25″ x 5.5″), so I drew the frame that’s the size of the card in my sketchbook first. Bold and simple designs work really well for block printing and definitely easier for beginners.
I really liked one of my watercolor painting of camellias, so I sketched the design based on the artwork using a pencil.
2. Trace the design with pencil on a tracing paper.
3. Transfer the image on to the art foam sheet surface.
Put the tracing paper down with pencil side facing the art foam sheet. (I grabbed this art foam at a craft store.) The pack of art foams I got came in variety of colors, and I just used this blue one.
On the hindsight, I probably should’ve used a lighter colored foam sheet because it was hard to see the pencil lines on the blue sheet.
These art foam sheets are handy because it’s got adhesive on the back, and it makes it really easy to mount the pieces on the board later.
To transfer the image, you rub the tracing paper from the back with a spoon or a bone folder. Be careful not to make an indent on the foam sheet because that will show up when you start printing.
4. I MADE A MISTAKE HERE – You’re supposed to do step 5 first before cutting all the pieces out 😀
But I wasn’t following Andrea’s instructions carefully and cut all the pieces apart before adding the lines and details. It’s easier to add lines (essentially drawing on the foam sheet) when everything is on one sheet.
Anyway, do that first, and then you can cut out the pieces with scissors or an exacto knife.
5. Add lines and details to your stamps.
So make sure you do this first before cutting all the pieces out. As you can see, it’s not the end of the world if you reverse the process, but it’s definitely easier if you do the detailing before cutting them apart.
To add indented lines, you go over your drawing on the foam sheet using a tool with a sharp tip – in this project, I used a skewer. You can also use knitting needles, dried-up ball point pen, and other tools for making an indent on a foam surface.
When printing, the indented lines will not get inked and the flat surface will get the ink. Again, be careful not to make a mark with your fingers/nails where not intended. If you do, it will show up in your prints. When accident happens, though, I try to be flexible and incorporate it into my design somehow 🙂
These foam pieces look cool just by themselves, don’t they?
6. Mount your stamp pieces on a piece of plexiglass.
I got a piece of acrylic sheet at an art supply store and cut them down using my exacto trimmer – it sort of worked but totally shattered the edges of the plates and aren’t very pretty!!
(I later ordered this cutting tool from Hyde and hope it does a better job.)
You place the plexiglass cut to size (mine is 5.5″ w x 4.25″ h) over your design and peel the backing from the sheet and stick them on to the plate.
By mounting the pieces on to the plexiglass, it makes it easier to print the same design over and over, and you’re able to apply even pressure on to your stamps when printing.
Again, be careful not to make an indent on your foam pieces while sticking them on to the plexiglass.
Since I wanted to print my design in two colors (one color for flowers and another for the leaves), I’m creating a separate plate for just the leaves. I didn’t quite like the layout of my original drawing, so I’m shifting some leaves around here.
7. Two plates with the foam pieces are done!
8. Here is the test print I made using stamp pads.
To ink the plates, I lay the stamps on the table and coat the foam sheet surface evenly using the stamp pads.
Then I pick up the mounted stamps, lay the plate down straight on to the paper and apply pressure using the palm of my hand. I marked the corners of my plate on the paper so it’s easy to match up the two plates.
I used the red ink for the flowers and navy blue for the leaves. Pretty, yes ?
You can wash, pat dry and fine tune any of the details on the foam and print more until you’re happy with the result.
It was a pretty quick project. It probably took me about an hour or an hour and a half from start to finish? And clean-up is pretty easy as there was no paint rollers or plates to clean up!
I want to experiment and create more fun stamps to play with! 🙂 Hope you’ll give it a try!
p.s. I’m offering a foam stamp making workshop on February 4th in Seattle. If you’re curious, head on over to my website and learn more 🙂
It’s my absolute favorite carving blocks to use for my block printing practice both professionally and for fun!
Let me back up a little and tell you how I got started with block printing first.
I took an amazing e-course, Design, Carve, Print, by Jen Hewett in the winter of 2015 and got immediately hooked.
My first fabric block printing project in the winter of 2015.
I love the process of block printing. It engages your creativity in many different ways through the entire course of production, from drawing on paper to carving the block to designing and printing on fabric.
Before I learned how to block print on fabric, I tried linocut once after buying a beautiful linocut piece at a farmer’s market and loved how it looked.
But the linocut block was very difficult for me to carve as a beginner, and I got really discouraged…
My first and only linocut project. It was very hard to carve, and I didn’t enjoy working with the oil-based ink, either. So messy!!
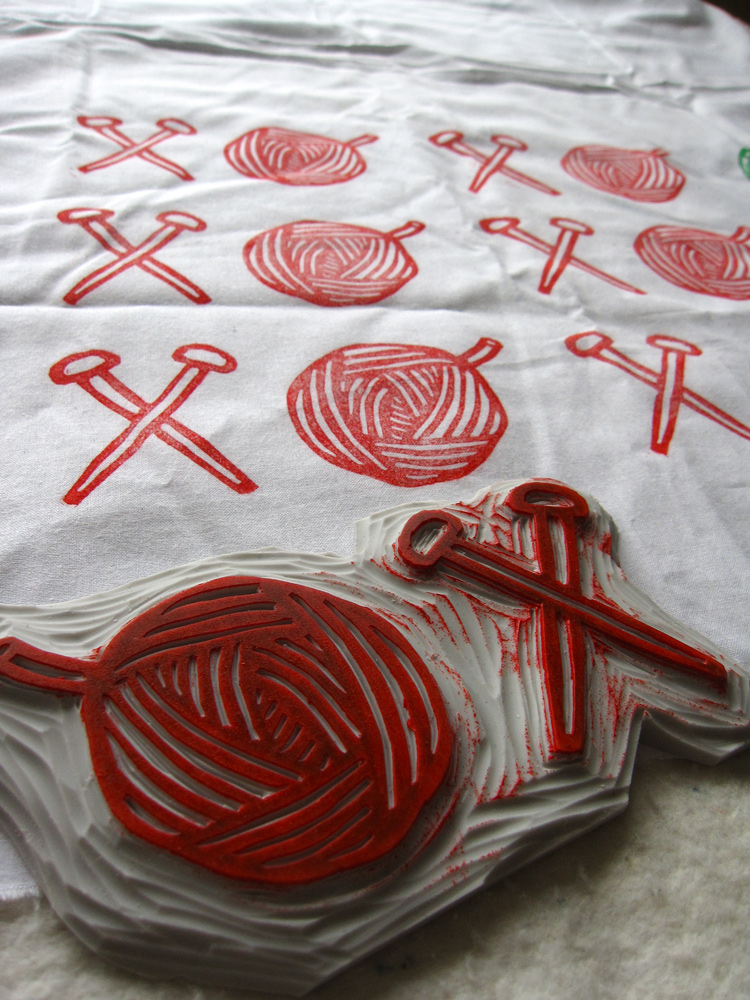
After taking Jen’s course, I learned about MOO Carve, and it totally changed my block printing world!
It’s a little thicker than the block printing blocks you get from other companies (about 1/2 inch thick). Their material is very similar to rubber eraser, and it cuts like butter! I like how easy it is on my hands and how quickly I can carve my designs.
Valentine’s XOXO design for knitters/crocheters. February 2016.
One drawback of using a softer material is, if you’re not paying attention, it is pretty easy to cut through parts you aren’t supposed to. I’ve also broken off parts of my block (especially smaller details) while washing… Oops.
(If this happens, you can try to fix it with the super glue or “modify” your design a bit around your mistakes… It’s an opportunity for creative problem solving! :))
Other than a few mishaps here and there, all of my blocks have fared pretty well after making hundreds (yes, hundreds…) of prints!!
Some of the fall/winter designs from last year. I use the Speedball lino cutter and baren.
It’s been almost a year and a half since I took my bock printing class. I was making block printed products to sell for a while but decided to cut back on that this year as I was afraid my passion was dying…
For now, I mainly block print for fun. You can see my most recent printing and sewing project in this post.
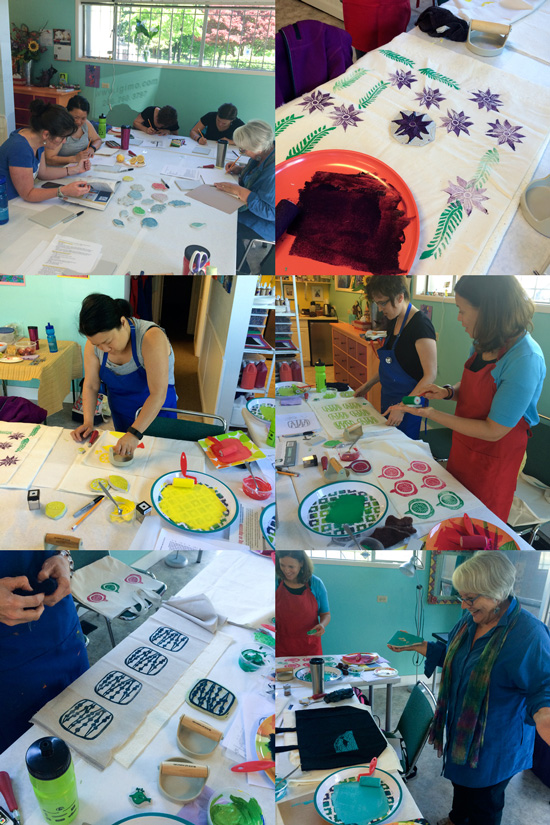
I’ve also been enjoying teaching others how to create their own beautiful block printed fabrics since this spring!
Teaching block printing is so much fun 🙂
I use MOO Carve blocks for the classes I teach as well, and many of my students are surprised to learn how easy it is to work with the material!
It’s a little pricier than some other brands,’ but it’s well worth it to me. I usually buy them from Blick online store or Amazon depending on what else I’m buying.
If you’re a print maker, give it a try and let me know how you like it!
If you’re level 3, you can still teach level 1 and 2. It’s actually better that I’m not a master block printing artist because I can understand better the struggles beginners might have.
In the spirit of sharing what I know, I wanted to tell you some of the lessons and tips I’ve learned about putting on an awesome workshop!
1. Develop a positive relationship with the venue owner and respect the facility.
I got introduced to Sally, the owner of IGIMO Art Station by a friend of mine late last year. IGIMO is an art studio in my neighborhood, and they offer lots of fun art classes for kids and adults.
When I pitched the idea of teaching the block printing workshop at her studio, Sally was super open and supportive. She made me feel welcome and so generously offered me to use her space in whatever way I needed.
In order for me to continue our positive working relationship, I try to keep an open and consistent communication with her and make sure we’re treating her studio space with respect.
2. Tell everyone you’re offering a workshop. Repeatedly. Everywhere.
I swear, marketing is all I do nowadays.
Because, you know, even if you make really awesome art or offer super fun workshop, it won’t matter if people don’t know about it!
I started promoting my workshop early on (about 2 months before?) on my social media, email list, and posting flyers in the neighborhood. And I did that multiple times.
By the way, I had a great return on investment with boosting my event on Facebook. I spent about $50 to boost my event post for like 6 weeks (roughly $1 a day) and got at least 3 sign-ups via FB (that’s $375 revenue). I’ll probably try that again!
3. Try to answer as many questions as possible up front by providing FAQ on your website.
When I posted the information about my workshop on my website, I just had a basic information, like dates, time, location, a brief description, and cost.
So when a very first student signed up, I sent her a welcome email and asked her if she had any questions. She did have a couple of really good questions I wasn’t thinking about, and I was able to incorporate them into the Frequently Asked Questions list I was working on.
Having some sort of FAQ is going to be super helpful because many students will have the same questions, and it saves you and them time if you can point them to the list instead of replying to their questions individually.
My FAQ includes informations like the day’s schedule, what to do about lunch, what to bring, what to wear, where to park, size of the class, and my cancellation policy.
I keep adding more questions/answers to the list as I go. You can take a look at my FAQ here if you’re interested in learning what I included in there!
4. Send welcome messages and reminders.
I just embedded simple PayPal button on my website (here is the instructions on how to do it. It’s pretty easy) for registration and ask them to enter their name and email. No bells and whistles there.
When I receive the notification for their payment, I send them a welcome message confirming the receipt of the payment, date/time of the workshop, and attach the FAQ in case they haven’t seen it.
Like I said earlier, I have a cancellation policy that’s included in the FAQ and want to make sure my students are aware of that in advance.
This is also a good time to see if they have any other questions my FAQ is not answering.
If I worked on any new block printing project or found cool resources between their registration and the class, I would share the information with the students on the list to get them excited.
I typically send them a reminder email a couple of times – once about a week before and then just a couple of days before the workshop date. Again, I’ll confirm the date/time and attach the link to my FAQ.
I know we all get busy and don’t read every email we receive (or read the email throughly), so I like to remind folks more than once.
I also include my cell phone number in the last reminder so they can contact me directly on the day of if needed.
When I’m setting up for the class in the morning, I’m not checking my email (and I never have my email notification on) so the cell phone is easier for any last minute communication.
5. Provide visual examples and inspirations before and during the workshop.
When you’re working on an art or craft project, it’s always helpful to have reference materials and inspirations handy.
If you’re new to the craft, the blank canvas can seem very overwhelming and your student might not know where to start.
So I’ve created a block printing design inspiration board on Pinterest (you can view it here) and share it with my students when they sign up.
I pinned variety of styles and designs, from intricate florals to simple geometric shapes, so the students who are not super comfortable drawing know that they can still make beautiful designs without any drawing skills 🙂
I also bring my favorite block printing book, Making an Impression by Geninne Zlatkis (it’s the most beautiful craft book I’ve seen!!) and some of my carved blocks to the class for reference.
Some of my beloved blocks ❤
6. Break down your process into small steps and document them.
Although I’m still relatively new at block printing, I’ve had many practices so far and no longer have to think about the steps when I block print.
So when I was working on a block printing project for Valentine’s earlier this year, I paused every so often and documented every step. I actually got a blog post out of it, so that was even more awesome 🙂 (You can read it here. )
While I was working on it, I tried to put myself in the shoes of someone who’s not familiar with the tools or processes at all. I also read a bunch of how-to articles on block printing to learn what processes others followed and tried to see if I was missing anything.
Having a documented step-by-step process also helps ensure that your students are getting a consistent instruction.
I also take notes while teaching the workshop on where students get stuck or have a hard time understanding my instructions so I can improve my teaching for the future workshops.
7. Have all the supplies ready and make sure they work!
When I was planning for the workshop, I wrote down every single item we were going to need for the workshop and researched where I could get them at a cheaper price.
I set a goal to at least order everything a month before the workshop date. That way, if something goes wrong or the shipment gets delayed, ideally I’d still have time to fix the issue… 😀
AND, when you get your supplies, make sure to open the package and see if they actually work. I learned the lesson the hard way with the linocut tools I ordered.
They came on time, and I assumed they were all fine. But the day before the workshop, I decided to take the tools out of their individual box and assemble them just to make sure it came with all the parts necessary.
And I found out 3 out of 8 tools had defects and didn’t work!
It ended up working out OK because I’d ordered extra (another important point!) and at that time, I had 5 students signed up for the workshop. But I certainly didn’t enjoy that “oh sh*t” feeling the night before my first workshop 😀
8. Provide resources and handouts.
I wanted my students to get as much value out of the workshop as possible since they’re paying to spend a day to learn something.
So I put together a packet for each of them to take home. It includes materials list, where to get exactly the same tools and materials we’ve used in the class, overview of the steps, tips, and other block printing resources.
After they learn the basics in my workshop, I want them to go home with confidence and continue exploring the craft on their own.
With the well-organized handouts and resources, my hope is that they will!
9. Walk around and check in with each student during the workshop.
This workshop is pretty hands-on, and students spend majority of their time working on their own project.
Some students are more vocal about their needs than others, and it’s easy for me to know what they need and help them.
I also try to check in with other, quieter students just as often – not because I don’t think they’re doing a bad job, but sometimes people are shy about asking for help, or they might otherwise don’t catch potential problem areas before it’s too late.
For this purpose, and since I’m still learning, I keep the class size pretty small (max. 6 students). I like the intimate environment a small class creates and believe it provides a better learning experience for my students as well.
10. Ask for feedback and testimonials. And don’t forget to take photos!
At the end of the workshop, I hand out a short feedback form. I ask a few simple questions, like what they enjoyed the most, what could be better, and if they’d recommend the workshop to their friends and family.
I also ask if I could use their feedback in my marketing materials, and most of them would say yes.
When the students enjoy the workshop and are excited about what they’ve just created, they are much more likely to give you a great testimonial. And including the question in the feedback form makes it more convenient for both of you!
Your students can also give you great ideas about what other workshops or services you could be offering. For example, a couple of students in the last workshop asked if I’d be offering any “second stage” block printing class or an open studio. And maybe private group sessions for adult birthday party! How fun!
I also try to take photos during the class (with their permission, of course) so I could use them for marketing/promotional purposes. It’s so fun to share the amazing work they do with the world 🙂
11. Send them thank you message.
Finally, a day or two after the workshop, I send a quick email thanking them for their participation and share the photos I took during the class.
I let them know they can contact me if they have any questions in their future block printing practice.
If they indicated on the sign-in sheet that they’re interested in joining my email list, I subscribe them so they can stay informed about my future offerings and updates.
I indeed learn so much by teaching!
And I LOVE it 🙂
I feel so lucky to be given this opportunity and am looking forward to teaching more in the future!
p.s. If you’re in Seattle area, you can join one of my workshops this summer 🙂 Check out the class schedule here.
I took my sabbatical week off during the week of April 18. It’s been a couple of weeks, but I wanted to show you the block printing and sewing projects I worked on.
I take every 7th week off to relax and do things I don’t normally have the time to.
It’s kind of scary to take a week off so regularly, because, I often feel I need to be making $$ and can’t afford to take a time off. BUT, it’s important for me to make the time for reflection and recharge on a regular basis. It’s been one of the best business strategies I’ve taken! (You can learn more about what the mini sabbaticals are all about here.)
Sadly, I’d been sick with a cold for a couple of weeks and was behind on some work stuff, so I ended up working a little bit during my sabbatical.
But I also made sure to do something just for fun!
You probably know I’ve been practicing block printing on fabric for a while now.
I love the whole process of designing a block to seeing the prints on the fabric. Time just flies by when I’m engrossed in block printing!
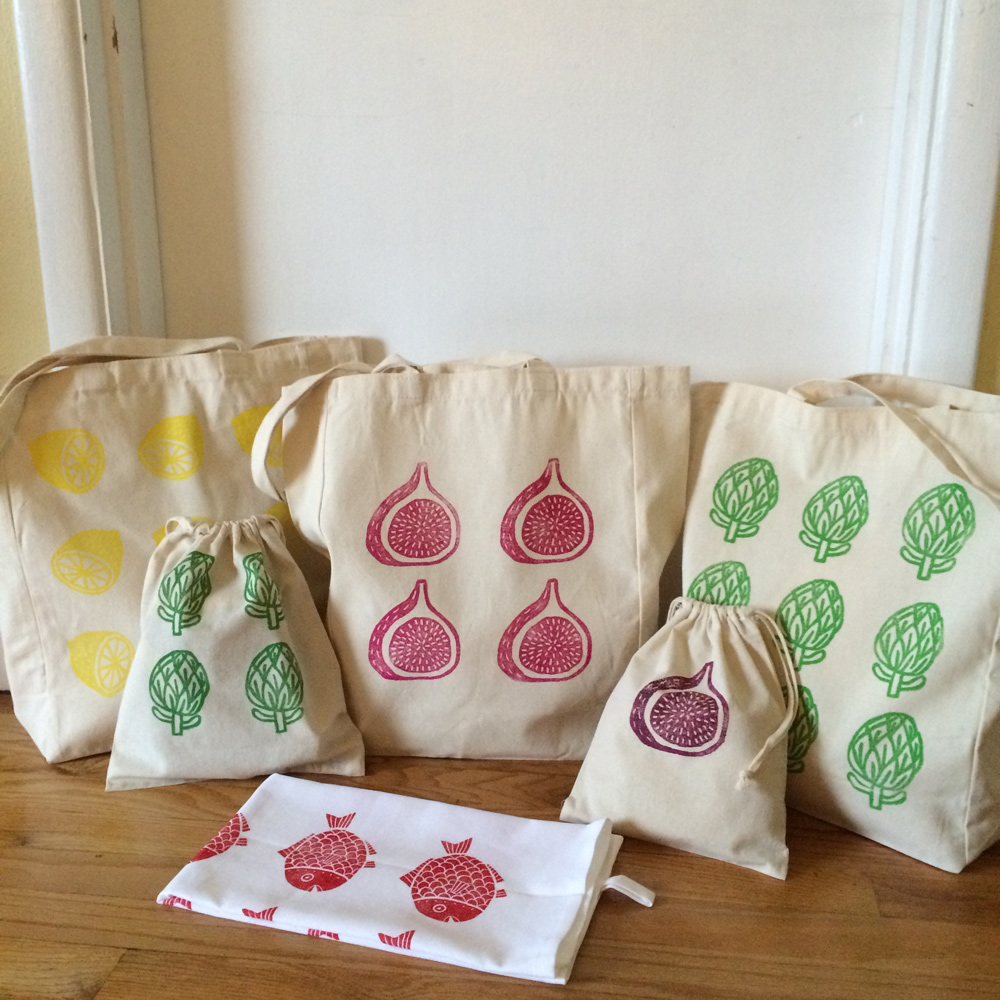
My block printing family 🙂
But I’ve also been feeling a bit burnt out on making block printed products, like tea towels and bags.
Considering all the hard work that goes into it, it’s not very profitable, and frankly, printing the same things over and over got old pretty quickly.
I was afraid I was losing the joy of block printing.
While I continue to focus on developing my art product lines, I’ve been focusing more on producing things that are easily replicable, like art prints and greeting cards, and moving away from block printing for production.
But a lot of people like the block printing aesthetics, so I started teaching block printing on fabric workshops recently at a local art studio, and I really enjoy it!!
Beautiful student work from my first class!
By the way, if you’re in Seattle area and want to join my class this summer, I just posted new dates on my website 🙂
With that being said, I still love to do block printing and want to continue practicing. I think for now I’ll be teaching more and block print for personal enjoyment rather than making products.
For this sabbatical week off, I decided to make a garment from my block printed fabrics!
I’m not good at sewing – I’d hemmed my pants and made simple tote bags before. But beyond that, it seemed really intimidating.
Sewing a garment seemed particularly challenging because you can’t just wing it, right? You need to follow a pattern, cut the fabrics nicely, and all of your pieces need to match up…
I like to do all of my creative work very loosely and wasn’t confident that I could sew something I’d actually want to (and can) wear!
But, I was inspired by two of my printing/sewing heros – Sarah Golden and Jen Hewett (check out her Print, Pattern, Sew project from 2015 – It’s really gorgeous and inspiring!) and decided to finally tackle this!
Making garments by sewing straight lines? Yes please!
I got this Japanese sewing book, titled “Making Garments by Sewing Straight Lines” several years ago when I was visiting Japan. I was naturally attracted to the title 🙂 and all of the pieces looked adorable. I’d been just admiring the pictures until now and I’m glad I didn’t throw it away!!
I chose one of their patterns for a top that seemed pretty easy.
This one!
I didn’t want to spend a lot of money for the project, so I went fabric shopping at Goodwill as per my friend Sarah’s recommendation. If you’ve never gone fabric shopping at thrift stores, they’re awesome.
I looked around their fabric section, bed sheets, table cloth, and curtains. I saw so many cute fabrics there and was tempted to get them all! But I wanted to start small in case I hated sewing 😀 and bought two fabrics.
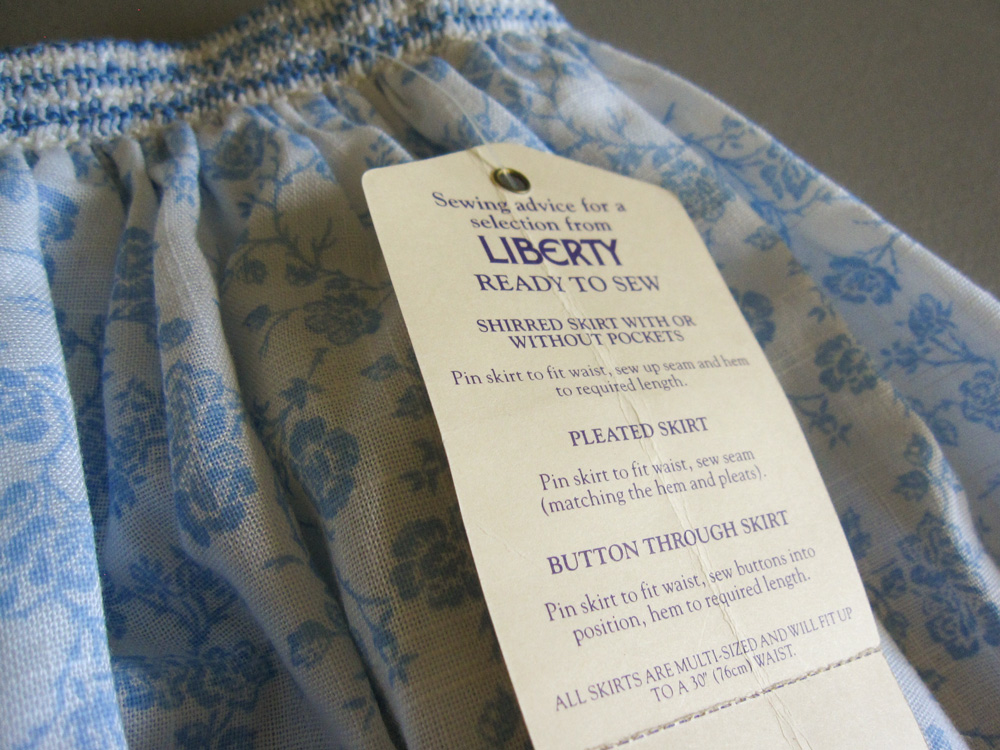
I wanted the color and pattern on the fabrics to work well with my block print design, not compete against it. So I picked a simple grey and white porka dot cotton bed sheet and a light weight cotton ready-to-sew blue flower pattern skirt.
And I got so much material for $5 each! Score!
Ready to sew? I like the sound of this…
For the block print design, I thought it would be fun to carve my recent obsession – poppies.
Can’t seem to stop drawing these lately…Hand carving poppy & leaves. I use Speedball linocut tool and Moo Carve soft rubber blocks.
After I hand carved the pieces, I test print on a white cotton fabric. This is where I see areas I want to tweak and refine.
Test printing on white cotton fabric. I print with water-based fabric screen printing ink.
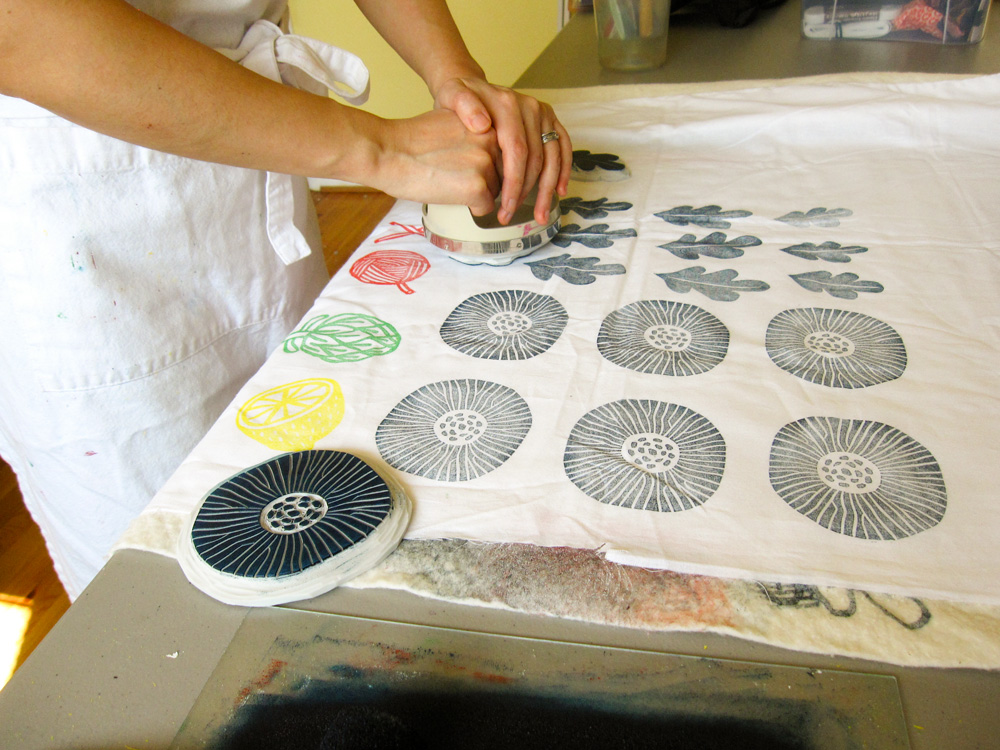
Once I was happy with my blocks, I started printing on the actual fabric I was going to make my top with!
For the fabric design, I decided to do just a simple block pattern. I toyed with the idea of incorporating the leaves too, but it just got too complicated… I believe in simplicity!
Printing on upcycled bed sheet from Goodwill
It took forever to print my poppy design on enough fabric to make one top, y’all. Then I had to air dry it over night and heat set with the iron before cutting into it. Phew.
Though I picked a very simple sewing pattern, (and the book promised it was “easy” and “quick”) there were so many little steps, and it was still pretty challenging for beginner like me. I mean, I still can’t sew straight lines, you know? 🙂
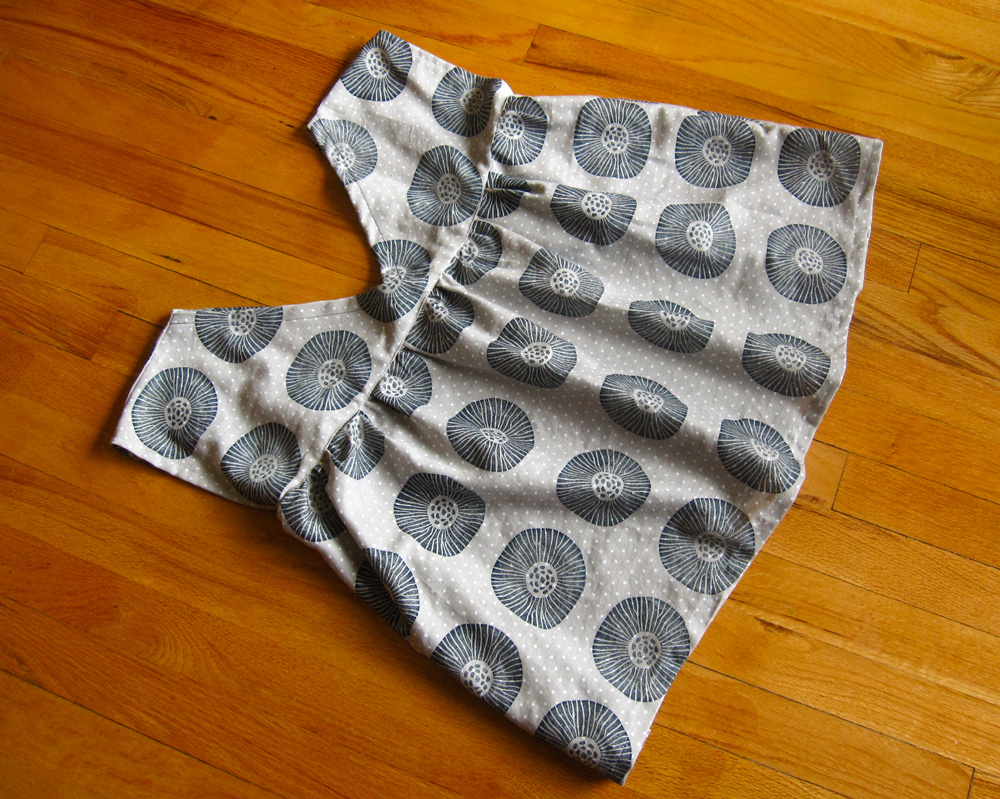
But, I didn’t quit and finished my very first hand printed garment!! Ta da!!
My very first block printed sewing project! It’s so cute ❤
And, I love how it turned out! ❤
Not bad, right?❤
Of course I see all the flaws and mistakes, but it’s good enough to wear around the house 🙂 It fits quite loosely, so it would be perfect during the hot summer months.
I just hope it won’t come apart when I wash it in the washing machine… 😀
For the ready-to-sew skirt, it was a lot easier because all I needed to do was to adjust the waist and the length. No pattern required!
I printed the poppy and leaves along the bottom. Honestly, I didn’t have the time or energy to print all over on another big piece of fabric and thought it would be a cute design anyway.
Since this was going to be a more dynamic design, I incorporated the leaves to add visual interest and movement.
I sewed and attached the shoulder strap and made it into a multi-purpose dress and a skirt!
It’s super light weight and again perfect for hot summer days ahead.
2 ways to enjoy one skirt! p.s. Modeling is super awkward… 😀
It was a lot of work but (or maybe because of it) it was also very satisfying to make my own clothes with my hand printed fabrics!
I always had respect for people who can sew, but this experience definitely made me appreciate the craft 100x more!! Bravo, you sewists out there!
I’d love to continue practice sewing and deepen my block printing practice in the future.
And I can’t wait to share my process with you on this blog 🙂