Tag Archives: blogging

My Blog Workflow & Editorial Calendar

honeyberry-studios-blog-calendar_lores

Hi there!

I shared my tips on how to blog consistently in my last post. Today I want to show you the app I use to organize my editorial calendar and workflow.

Until recently, I’d never really used a formal organization system for my blog. When I was publishing a weekly blog, I’d just jot down my ideas on a notebook and moved things around on a paper to sort of organize them. It worked out fine, but since I increased it to 3 times a week, it became a little harder to manage, and I needed a better organization system.

So I did a little research and found Trello. Trello is a free project management app (you could also pay for added services) to help organize all types of projects. All the reviews I read said how easy it is to learn and use, and they also showed an example of people using it as their editorial calendar, so I decided to give it a try!

I’ve only been using Trello for about a month, but I really like it! They have tutorials and blog posts on tips and tools, and their product is pretty easy to use. I like the simple user interface and drag/drop function to move my items along the workflow.

I pretty much copied their example for setting up my editorial calendar and created my workflow like this:

Trello workflow blog editorial calendar honeyberry studios

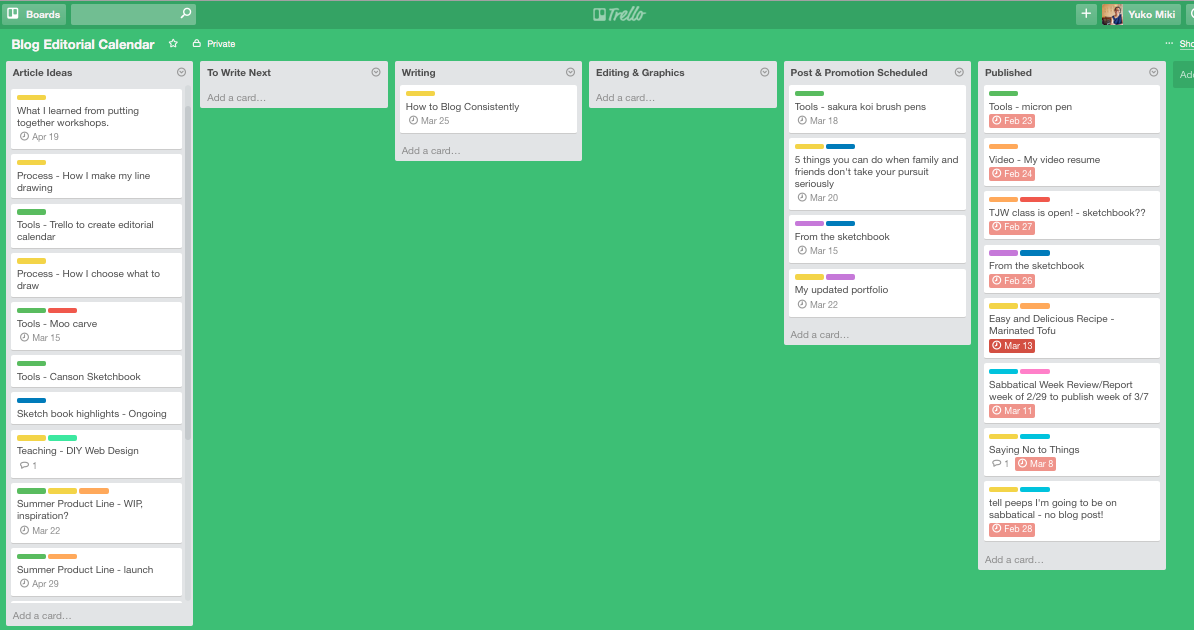
Article Ideas –>  To Write Next –> Writing –> Editing & Graphics –> Post & Promotion Scheduled –> Published

And here is what I do for each step:

Article Ideas:

Like I mentioned in my last post, I refer to Seanwes’ list of 62 blog topic ideas quite a bit to get inspired.

To come up with blog article ideas, I do a brainstorming occasionally and jot down ideas whenever I think of potential topics. I make a new card (which is like a sticky note you can write things and move around) in Trello under the list “Article Ideas” to keep them in one place.

You can add categories to each card (i.e. your virtual sticky note) if you want to. My general categories include themes like Products & Services, Tools & Product Review, Processes, Lifestyle, DIY, Art & Illustration, and Self-Care. You can see the list of categories (it’s called Labels here.)

Honeyberry Studios Trello Blog Categories

I try to mix variety of topics to inspire and encourage people to live a fulfilling creative life.

To Write Next:

When I add potential blog topics to my list, I also assess if any of them are time sensitive or relevant to publish during a certain time period to promote an event or products.

For instance, when I was a guest Instagrammer for Sakura of America last month, I wanted to let my readers know about it right before it started so I wrote a blog post about it and published it the day before it started. Or I try to share behind the scenes look and work-in-progress of my new products and services as well so my audience learn the story behind my creations in a timely manner.

Once you're in the "card," you can add the due date.
Once you’re in the “card,” you can add the due date.

Other topics can be more free floating and flexible. I try to share recent works from my sketchbook regularly and write a review on tools and resources I love.

I try to rotate topic categories regularly so my readers can enjoy learning different types of things from my blog. So I might write an article about my favorite tools one day, and the next one might be about my recent drawings, and the next one can be more focused on self-help for artists.

Once I determined the timeliness of the articles, I move the cards with the most urgent due dates to “To Write Next” tab.

Writing:

Then I start writing my first draft in WordPress.com. My first draft is very very informal.

I start with some kind of a working title. Sometimes it’s the final title, and often I change it depending on what my final article is like. This is also when I schedule the date and time for my blog to start saving. I just don’t want to publish my draft accidentally.

WordPress honeyberry diary draft schedule

Anyway, I just start typing whatever comes to mind about a topic in no particular order.

I might just put down some words and phrases and keep going.

This short video where Seanwes shares his writing process was super inspiring and helpful. He says when you’re writing your draft, pretend you don’t have a back button on your keyboard and just keep typing.

I used to get stuck on small details and was trying to edit as I went when I first start writing. And since I switched to this method, I just get more contents down on my page a lot quicker.

Even though I’m not as hard core as he is about not deleting or correcting something as I go (I still fix typos as I see it), it helps to get ideas out of my head and keep going. And as I get my thoughts out of my head on to the page, I think of more things to say and it makes my contents richer.

Some articles that are more contents-focused are naturally longer-form, and others like my sketchbook round-ups are more visual focused and usually short form.

Editing & Graphics:

Once I’m done with my draft, I normally come back to it a day later or so. It helps me to see my writing with fresh eyes and mind and helps with the editing process.

In this phase, I correct mistakes, typos, add or delete things, insert links where necessary, change orders, explain things differently, and try to make it flow better in general.

This is where I usually create or find images to use for the blog as well.

If it’s more content-heavy post, I normally create a new title image. I come up with a concept that represents the message of the article or create a handlettering piece that matches the title. I try to spend no more than 2 hours for creating the title image from start to finish.

If I’m writing a tutorial or tools review, I take screenshots or photos of the tool after writing the draft. Oftentimes, I realize I need more images for the article as I edit, so might do more photoshoots later.

Once I have the images, I edit them on Photoshop and upload them on to the WordPress media library to use in my posts.

And then, I go to the preview mode and read the article on the webpage. I often notice new mistakes when I’m reading it in the Preview mode. So I go back and forth between the preview mode and the draft page to fix mistakes and anything that doesn’t flow very well.

I repeat this process a few times.

I also test all the links in the preview mode to make sure they work. Nothing more frustrating than a broken link!

Post & Promotion Scheduled:

Once everything looks good, I create and schedule a post about the blog article on my social media, namely Facebook and Twitter.

I set the schedule for the blog post on WordPress when I start writing so I don’t accidentally publish it immediately as I write. But if I change my mind about the publishing date and time, I could change it here or later.

I copy the blog shortlink, which WordPress creates for you or you can use services like Bitly to shorten it. Otherwise, the link to your blog article can be super long and cumbersome.

I come up with a little blurb about the blog article to post on each social media platform so my audience has some ideas about what the blog is about. I also use one of the images (usually the title image) from the post and manually upload them on to each social media post. I’d like for my audience to see different images for each post rather than seeing the same old blog banner all the time as it’s kind of boring 😀

I’ve tried to use WordPress’ publicize feature, which automatically shares the post on connected social media accounts, but it was a little glitchy for me, mainly with the images not showing correctly or at all. I got tired of it not working as expected and that’s why I started scheduling the social media post separately manually. It was a long time ago, so maybe now it works fine. I just haven’t tried it for a while.

For my Facebook page (not my personal page), I just use their built-in schedule function.

For Twitter, I use Tweetdeck to schedule my posts. It was recommended by a friend, and I like it. It’s simple and easy to use. My only pet peeves would be that once I schedule a post, I can’t edit it? Maybe I’m missing something here, but only option I see is “delete.” So I end up deleting a post and re-creating another one if I needed to edit it. Which is not super awesome.

For Instagram, since I can’t schedule the actual post beforehand, I save the featured image on to my Photo app on my iPhone so it’s easily accessible when it’s ready to be posted.

Published:

And when the time comes, WordPress will publish your post at a scheduled time! Hooray!!

It’s satisfying to move my card to the Published column on my editorial calendar 🙂 I should probably empty them regularly as it’s piling up pretty quickly.

Screenshot 2016-03-19 07.42.44

I’m still new at using this tool and having an editorial calendar and am happy to share more as I learn the tool better!

Hope it was helpful 🙂

xo Yuko

Yuko_profile

6 Tips on How to Blog Consistently

Honeyberry_Illustration_blogging_linedrawing_lores

I get a lot out of inspiring people through my art and love to help other artists by sharing and teaching what I know.

I’ve been blogging pretty consistently since last summer. A friend asked me for some tips on blogging the other day and thought some of you might also be interested in knowing what works for me.

I actually first started blogging in January of 2014. That’s when I started taking my art a little more seriously, and everyone was talking about how you needed to blog to make your business more successful. So I said, why not??

I didn’t have a clear goal for my business or blog back then and just shared things I thought people might enjoy.

Then I started my 365 Day Happiness Is drawing project in April of 2014 so that became the focus of my blog for a year.

Though I was posting my art every day, my blog was just another social media platform for me to share my art on, so I wouldn’t count that as “blogging consistently.” There was hardly any writing involved.

After I completed the year-long drawing project, I knew my next goal was to write more consistently. You might wonder why visual artists might need to write, but I knew I could build a deeper relationship with my audience if I shared my writing more. I also wanted to help other artists with more practical things, and writing would be a good way to do that.

I’ve written a blog post about why I want to write more here if you’re interested! (<– You can reference your own materials when you’ve written a bunch of contents, which is also pretty nice.)

So here are my 6 tips on how to blog consistently:

1. Have a bunch of posts in queue before you start publishing

I have to say this is the best blogging advice I received and follow to this day. So many people want to publish consistently and have the intention of doing so yet have a hard time keeping up.

Why not have a bunch of posts ready to go before you start publishing them? It helps with the consistency and creates a buffer for when you need it (e.g. you get sick, other life events etc.)

It may be hard to fight the instant gratification of finishing something and sharing it right away, but it’s worth it. I like the feeling of not being on a deadline all the time!

When I was publishing my blog article once a week, I had about a month worth of posts (4-5) ready to go. I still have the same number of articles in queue, but since I post more often now, I would like to build up more reserves when I have time. My goal is to have solid 2 weeks in a queue at any given time.

2. Determine the “why” for your blog

Just like having a clear goal for any other creative practice, it’s important for you to clarify your purpose, i.e. your “why,” for writing.

What do you want to accomplish by sharing your writing on the internet? What value is your blog going to provide for your audience? Is it going to help someone? Is it to help yourself? Is it to document your progress with your goals? Is it to share your life with your friends and family?

And when I say value, I’m not just talking about helping people make money. It could be something to make people laugh or cry, stay healthy, find solutions to what they’re struggling with, help them cook a healthy meal for their family, entertain them with your stories, amaze people with your creations, or inspire them to create a fulfilling life for themselves.

You want to find the “thing” for you. And don’t worry about creating something new that’s not already out there…because…it probably is out there already! That’s not the most important point. The important thing is recognizing you have a unique voice and perspectives on things that only you can deliver for your audience.

Having a clear goal and direction for your blog will help you focus on what to write and makes it easier for your audience to find and connect with your contents.

3. Try to write in your authentic voice

When you’re writing to reach people and connect with them on an emotional level, you want your authentic self to show up and not the formal, grammatically correct self (unless that’s your brand personality!)

This is something I struggled with a lot in the beginning and still do especially as an English-as-a-second-language writer. Because I learned proper way to write textbook English growing up, rather than learning it naturally in everyday life, I have a hard time breaking the rules and knowing what’s acceptable and what’s not.

But I wanted my audience to get to know me through my writing, and I want my writing to be friendly, warm, and approachable. I want my readers to have a consistent experience whether they’re reading my blog or looking at my art.

In order to accomplish that, I follow these tips:

  • Write the way you speak. You still want to be careful not to be too disruptive with informal grammar or typos, but you want your writing to sound natural when you read it out loud. If you read your sentence out loud, and you’re tempted to say it differently, you might want to consider changing it.
  • Imagine you’re speaking/writing to someone you know. I pretend I’m talking to a couple of my close friends when I write. It helps my writing to be more personable.
  • I loved Laura Belgray’s 5 Secrets to Writing Non-Sucky Copy! It’s hilarious and helpful.

4. Publish your posts on a consistent schedule

If you want to grow your audience through your blog, publishing on a consistent schedule will help. You want your audience to look forward to seeing your contents and  make your blog part of their routine.

When I set my goal to publish a blog once a week, I decided I’d publish every Sunday morning at 7am. There are many statistics out there about when you get a higher engagement for your blog etc. I didn’t really worry about the stats, though, and chose the day/time based on the fact that people tend to have more time to read on weekends.

Earlier this year, I increased my goal to 3 times a week so I can share more about my art and processes on top of my self-help-y contents. I thought publishing on Tuesdays, Fridays, and Sundays would be a good schedule for me.

I wanted to avoid Mondays because it’s a busy day for most people going back to work etc. and your inbox tends to get flooded with emails that come in during the weekend. So Tuesday or Wednesday seemed like a better option. And by Friday, you’re ready to transition from work mode to a weekend mode, so you’re more likely to consume contents for fun and inspirations.

At least that’s how I ended up choosing those 3 days for my blog. I must say these are not scientific facts… 😀

Even if you don’t officially announce your schedule to your audience, having a consistent publishing schedule helps with your own accountability.

And if you do let your audience know and stick to it, they will learn to expect your contents on certain days of the week. For this reason, I would recommend publishing your blog at least once a week. It’s just easier for your audience to track.

5. Schedule time to write consistently

In order for me to stay ahead, I schedule time to write daily. Especially since I increased the frequency of my posts, I’d run out of my reserves if I become lax about it!

On my typical work day, writing is usually the first thing I do in the morning. Your brain is clear of information clutter and I can focus a lot better in the morning. I usually write 1.5-2 hours per day.

I know some people batch their writing, like for example, you can designate every Wednesday as a writing day, and you take care of all your blog writing that day.

I haven’t tried that method yet as that seems a bit much to me. Like making art, I like to write in stages and parts, then leave and come back the next day to add/edit. It helps me to look at my writing with fresh eyes, and I stay more productive that way.

6. Just start writing 

If you’re wondering what you should write or if you’re a good writer or worried about what people might think of your writing, just start writing something. Anything.

Oftentimes, you don’t know what you should or can write about until you actually start. And the blank page cant be very intimidating!

Like many things in life, starting is the hardest part. Just start writing about anything, like what you ate this morning and how you prepared it. Or how you’re struggling to start writing and how you’re feeling as you write.

Remember you don’t have to share everything you write! Write for yourself. Start journaling about what you do. And the more you do it, the easier it gets. You will start seeing some themes emerge and you’ll find your voice.

And, if you need ideas and inspirations for a blog post, you can get a list of 62 potential blog topic ideas in this Seanwes podcast episode! It’s totally saving my life as we speak!!

Writing never used to be something I enjoyed. I avoided it for a long time because I wasn’t comfortable. Now it’s part of my everyday creative practice, and I get a lot of satisfaction from it. Who knew??

I’m gonna share my writing workflow and tools I use on my next blog post! Stay tuned 🙂

xo Yuko

Yuko_profile