I recently worked on a map illustration for a couple for their wedding invitation. It was a really fun project, and I want to share my behind the scenes case study with you today!
Jess and Mike approached me last fall after seeing my work from one of my 365 Day Happiness Is art shows in Seattle. They said they liked my simple pen and ink drawings with watercolor and wanted something similar done for their wedding invitation.
1. Client Questionnaire
The first thing I do when I receive an inquiry for a commission work is to thank them for their interest and send them my client questionnaire to find out more specifics about the project.
My client questionnaire includes 17 questions to discover what the project goals are, what deliverables are expected, if there are any timelines, what would be a successful project, and what inspired them among other things.
I got many of the questions from Seanwes’ Value Based Pricing. They teach how to charge your client based on the value you create for them rather than charging flat fee for every project or asking for a budget up front. I was really inspired by this concept that lets you position yourself as an investment rather than an expense to your client.
I like having my potential client fill out the questionnaire first because it helps to clarify what the project is really worth for them. I find it especially helpful when a client says they want something quick and simple… because nothing is ever quick or simple!!
And even though many clients want to know how much the fee is up front, I can’t even begin to imagine how much it’s going to be without knowing what the goal is and what will take to achieve that goal.
2. Client Consultation
After I got their questionnaire back, I reviewed their information and believed I could help them with what they needed. So we met for a coffee to discuss further.
In our conversation, we went over their answers to the questionnaire more in depth and I was able to learn more about their personality and what they value. In a more personal project like this, it’s important that I get a picture of who they are because that’s essentially their “brand” and my final work will need to reflect that.
Both Jess and Mike are from out of state and have lived in lots of different places before they moved to Seattle and met a few years ago. They had recently moved to their new home in the neighborhood and love exploring what their new neighborhood has to offer.
Many of their wedding guests will be coming from out of town and have never been to Seattle before. They wanted the illustration to give their friends and family a glimpse into their new life together and get excited about visiting Seattle.
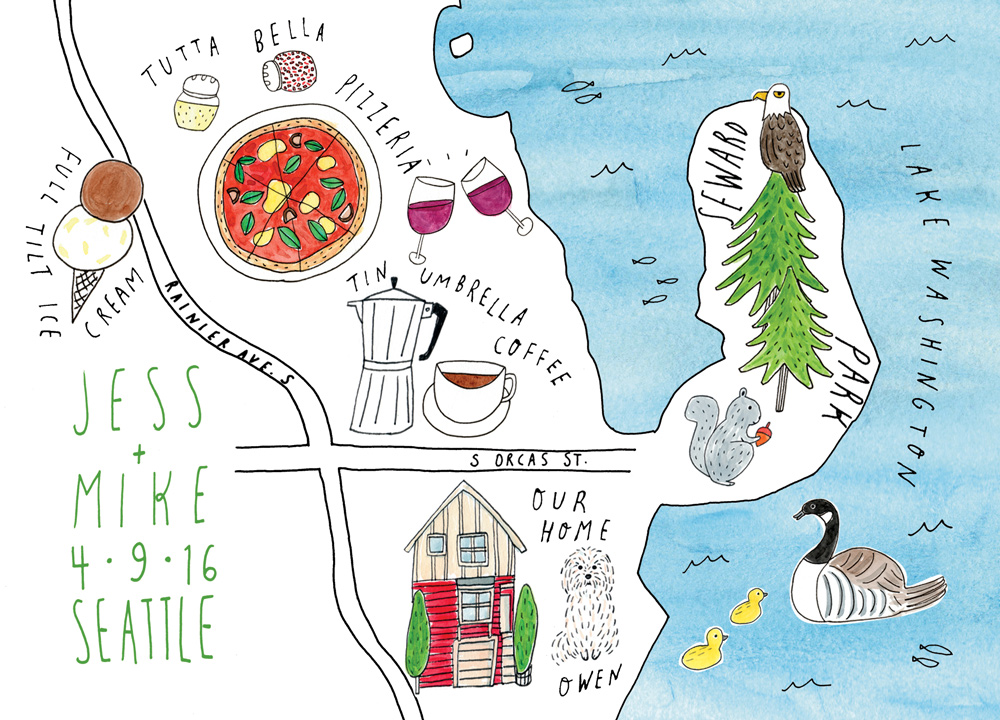
From our discussion, we decided it’s going to be an illustrated map of the neighborhood, including some of the landmarks that are meaningful to them.
I’ve always liked illustrated maps. One of my favorite illustration websites, They Draw and Travel, had just released their book of illustrated maps so I got it for more inspiration and research.
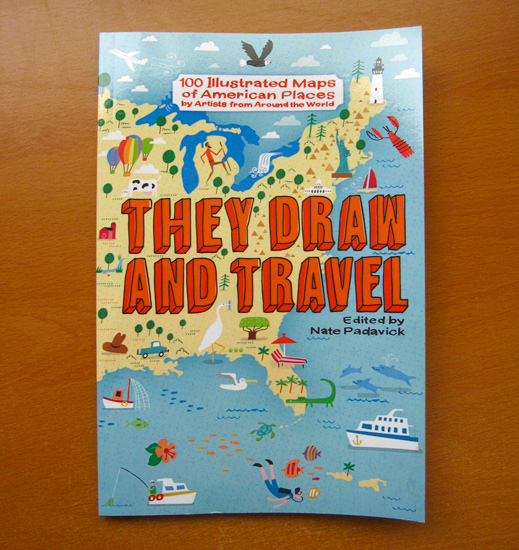
It was a perfect timing and the book is a treat for the eyes!!
3. Project Proposal, Contract & Payment
After our meeting, I put together a proposal (which also doubles as the contract) outlining my understanding of the objectives, timeline for everything, what deliverables they’re going to receive and how they’re going to receive them, and the fee estimate.
They agreed on the terms and paid the fee (I typically ask to be paid up front), so I put them on my project queue to work on.
The nice thing about requiring a payment up front is at least you know you don’t have to worry about getting paid afterwards! It really helps me focus on the project, and as a result, do a better job for my clients. It’s a win-win!
4. Research & Gather Reference Materials
I start my work by researching and gathering reference materials. I want to understand the subject as much as possible so I can translate their vision into a visual representation in a best way possible.
During my discovery process, it became apparent that my illustration needed to reflect their love for the neighborhood and how it’s a big part of their new life together. Since I also live in the neighborhood, I’m familiar with the landmarks and the feeling they’re referring to. But I’ve never really paid attention to the details of what’s there, so I took an afternoon to walk around and explore more.
For example, I went to their house and took some photos and got the feel for what’s around. I also visited the other landmarks they mentioned and looked around a bit and snapped some photos. I gathered some other reference photos online as well and read about what animals and trees grow around here.
5. Conceptualizing & Sketching
After I get my research done, I start sketching elements and concepts.


When I get a good idea of what to include in the piece, I create a rough sketch with pencil on paper. Here, I drew a couple of boxes in the same size as their invitation so I knew exactly the size I was working with.
After I decide on the general concept, I trace several aspects of different versions of my rough sketch on to a tracing paper and create a little more polished version of my concept sketch.
The way I typically approach my client work is – and I always explain this to my client and get them on board before starting anything – is that I get all the information I need up front and then go away and do my work. I don’t create multiple options for them to choose from or do revisions based on arbitrary feedback. (You can learn more about the One Concept Approach here. )
I do however show my client the initial concept sketch just so they know which directions I’m headed. If they have any objective feedback, like hey, you misspelled a name or it is way outside of the vision for the project, then I’ll take that into consideration moving forward.
6. Drawing, Digitizing & Refining the Artwork
Once we agree that we’re on the right track, I’ll continue working on the piece, revising and refining it many times to ensure it is going to meet the project goal.
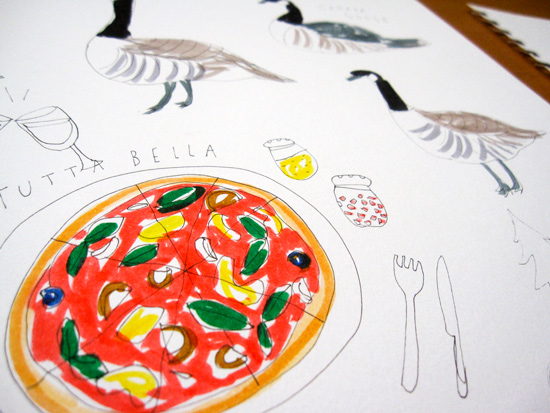
I create drawings of each of the elements separately in my Canson Mixed Media sketchbook. I usually start drawing with pen and ink directly with my Micron pen (used size 08 for this project) to create my whimsical and organic illustration style.
And then I colored them with watercolor and gouache (various brands). I wanted to make sure the overall feel of the piece fits my signature drawing style, so I paid attention not to overdo anything.
I drew a few versions of each elements (i.e. building, trees etc.) and chose the one that would work the best. I then cut them out of my sketchbook pages and taped them on to a sheet of paper and scanned them in.
I do this because my scanner is not very big, and it’s kind of a pain to scan the 9×12 page, and I can save time by scanning only pieces I needed.

Once I scan the hand-drawn pieces, I bring them into Photoshop and edit them (e.g. enhance colors, clean up the messiness etc.) to get them ready to be added to the map.
To draw the outline of the map, I pulled up Google map of the neighborhood and sketched it a few times on paper to practice. Drawing maps can be tricky. Though I’m not trying to create a realistic map, it still needs to be somewhat recognizable as the map of the area.
I ended up using a grid drawing method (here is a quick tutorial about the method if you’re interested) to get the general shape and proportions accurately.

I traced the map with the pen on the tracing paper and scanned it to be digitally manipulated.
Once I have the outline of the map and the illustrated pieces scanned and edited, I began to put them together in Photoshop, referring to the concept sketch I made initially.
I also print out the artwork several times during this process to make sure it’s legible and readable in the format the artwork is going to be used. Although you can’t really guarantee how the colors will be rendered on their end, it’s a good idea to check how they turn out from your printer. It’s always little different than what you see on your monitor!

I keep revising and tweaking. It could be a pretty tedious process!
Once I’m happy with the general layout, I create the lettering pieces to fit in the space. Again, I make a few different options, decide which ones would work best, scan them in, edit them in Photoshop, and bring them in to the artwork.
With the lettering pieces in a general place, I do the layout, tweak it a little bit, look at it carefully, print it out if necessary and repeat the process until I feel good about it.

7. Preparing & Delivering the Final Files
Once you’re done with all the revisions, it’s time to submit the final files to your client! Hooray!
For this client, I created a high-resolution PDF file for print and a low-res jpeg file for web (in case they wanted to share the work online with friends and family) and sent them via Dropbox.
It’s always a little nerve-racking to wait to hear back from the client after you hit the “send” button. Even though I know my work is good and I did everything I could to meet the project expectations, I often get anxious wondering if they’d agree!
Jess and Mike wrote back a few days later to tell me how much they loved the artwork 🙂 They loved it so much that they asked me to create the lettering work that goes inside of their invitation. I love it when a client is so happy with my work that they give me more work immediately!
And here is the final artwork for their wedding invitation!
I hope you enjoyed the behind the scenes look into my illustrated map project! Jess and Mike were great to work with, and I had a lot of fun creating this custom piece for them.
xo Yuko


Awesome map, thanks for sharing that link of other illustrated maps. It was a goal of mine to create one last year. I tried but haven’t done it yet. This will help. 😀
Oh wonderful! Yea it was super helpful to look at different types of illustrated maps for inspiration. Have fun with your map project!
Yuko
This is so useful. I am currently working on a commission that went a little sideways because expectations were not made clear at the start. I don’t get a ton of commissions, but I think I’m going to have to create a questionnaire like you did to avoid problems in the future!
Hi Stephanie!
I’m glad to hear it was helpful. Having some standard questions help to get all the important information up front. And you can build from there… I’ve had situations in the past (and I’m still figuring it out as I go) where we had different expectations and it caused some unnecessary frustrations on both sides. We’re not mind readers, and I tend to be a somewhat indirect communicator, so I need to be really mindful of how I’m communicating everything. Good luck and let me know if you have any useful tips to share! 🙂
Yuko